|
|
Свадебный торт "Влюбленные кошки" -Wedding cake with sugar cats V2
|

29.05.2012, 16:08
|
|
Администратор
|
|
Регистрация: 07.09.2010
Сообщений: 7,669
|
|
 Свадебный торт "Влюбленные кошки" -Wedding cake with sugar cats V2
Огромная благодарность Larraine McKay за Мастер-класс
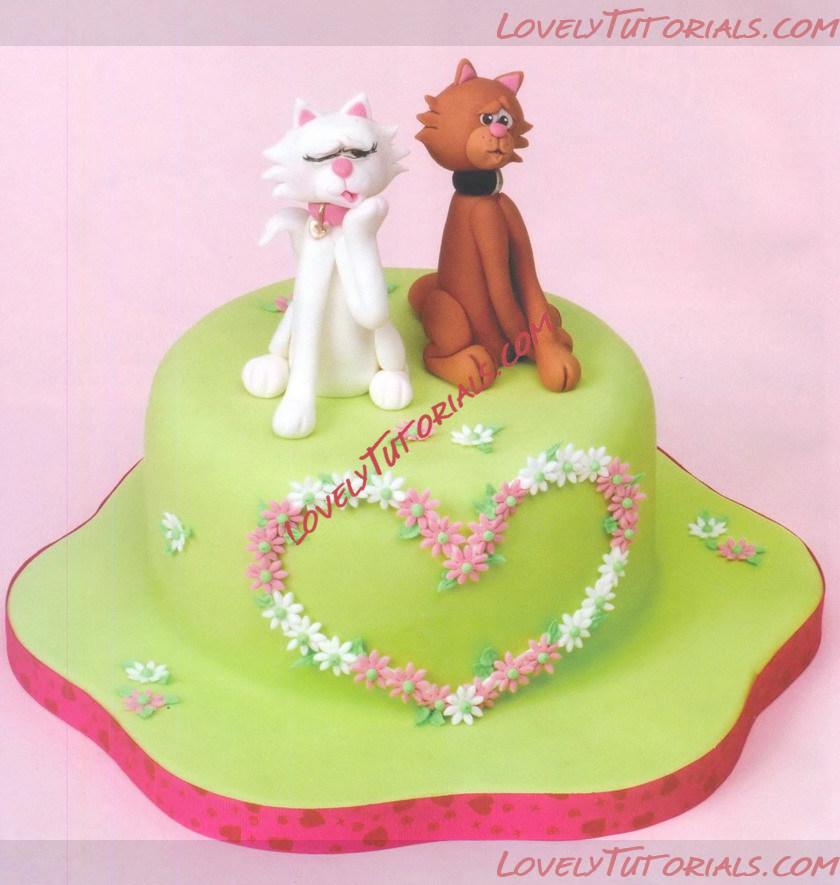 YOU WILL NEED
round cake 15cm (6in)
petal cake drum 25cm (10in)
sugarpaste white 520g (1lb 1oz)
flower paste 100g (4oz)
modelling paste white 170g (6oz)
clear alcohol
paste colours party green, melon, claret, chestnut,
liquorice (Sugarflair)
dust colours fuchsia, apricot (Sugarflair)
cmc (Tyopur/Tylose®)
small rolling pin
dusting brush
small paintbrush
edible glue
piping tip No.7, 123 (Wilton)
leaf veiner (PME)
ball tool (PME)
daisy plunger cutter small (PME)
sharp knife
dried spaghetti
Colour 520g white sugarpaste with party green and melon paste colouring. Place the cake onto the petal board and cover the cake and board all in one. Trim away the excess.
To make modelling paste:
Add 1 teaspoon CMC to 500g of Sugarpaste. Knead the Sugarpaste until all of the powder has incorporated. Wrap in clingfilm and store in a self-sealing bag.
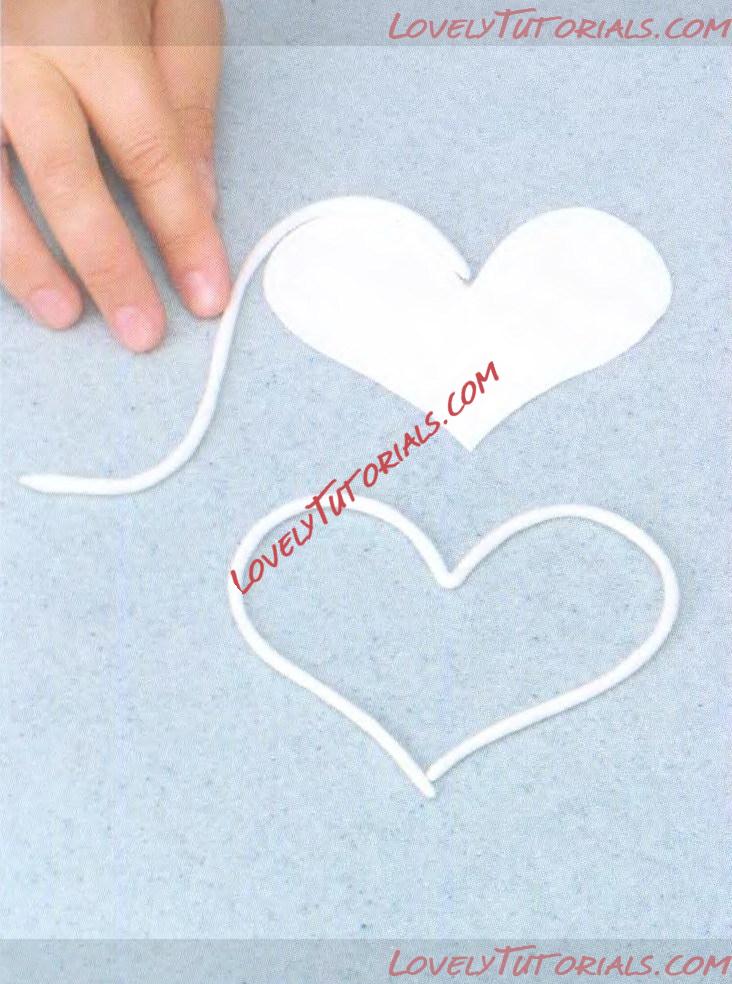
1 To make the heart, roll the flower paste into a long thin sausage and shape around the heart template. Leave to dry and set completely.
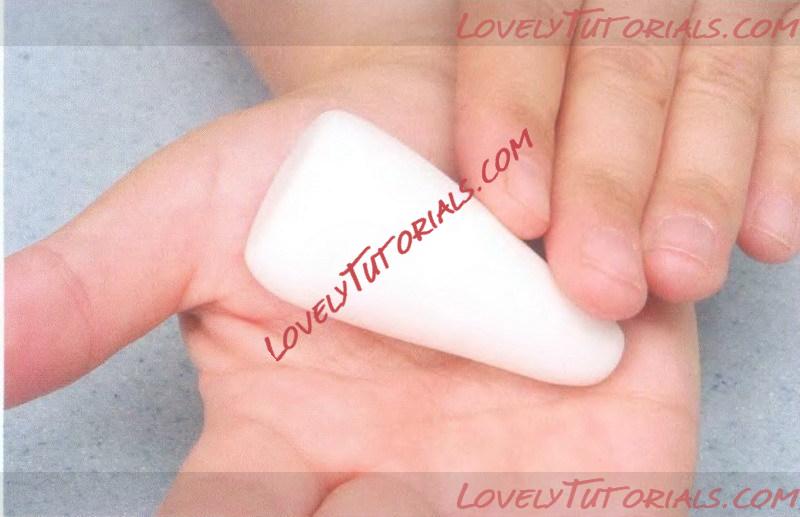
2 To make the cats, roll 30g of modelling paste into a tall cone shape tapering slightly at the neck end.
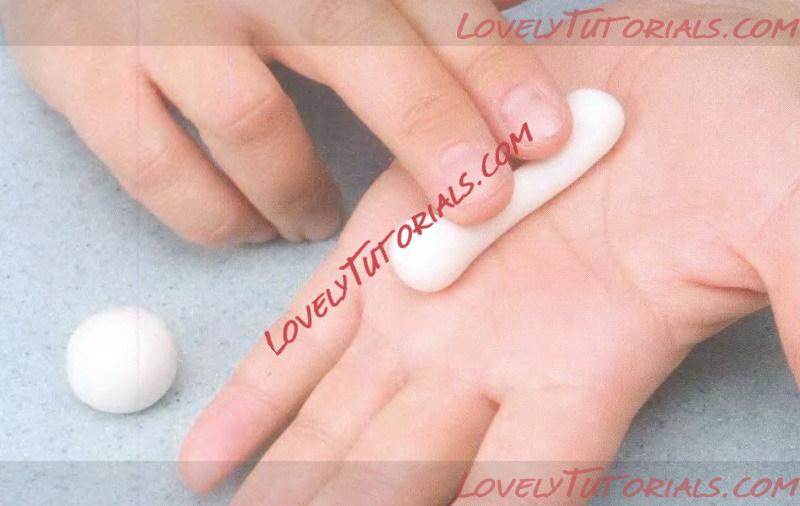
3 For the back legs split 10g modelling paste into two. Roll each one into a sausage, keep the pressure in the centre and each end of the sausage rounded. Flatten the thigh and push the paw forward to bend, pinch at the heel.
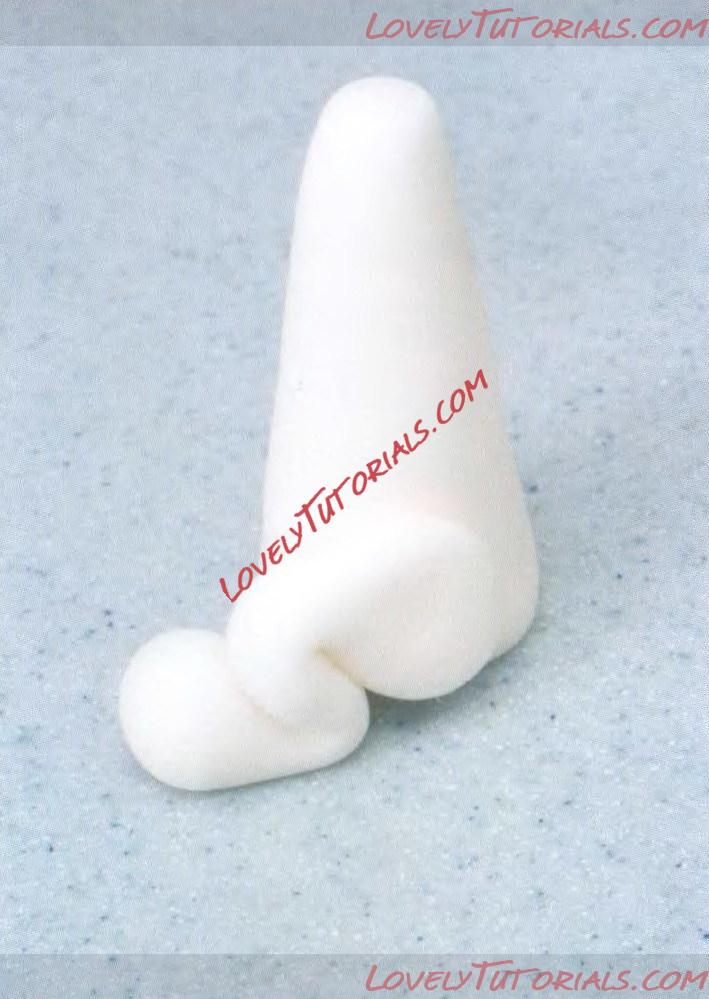
4Bend at the knee and glue into position.
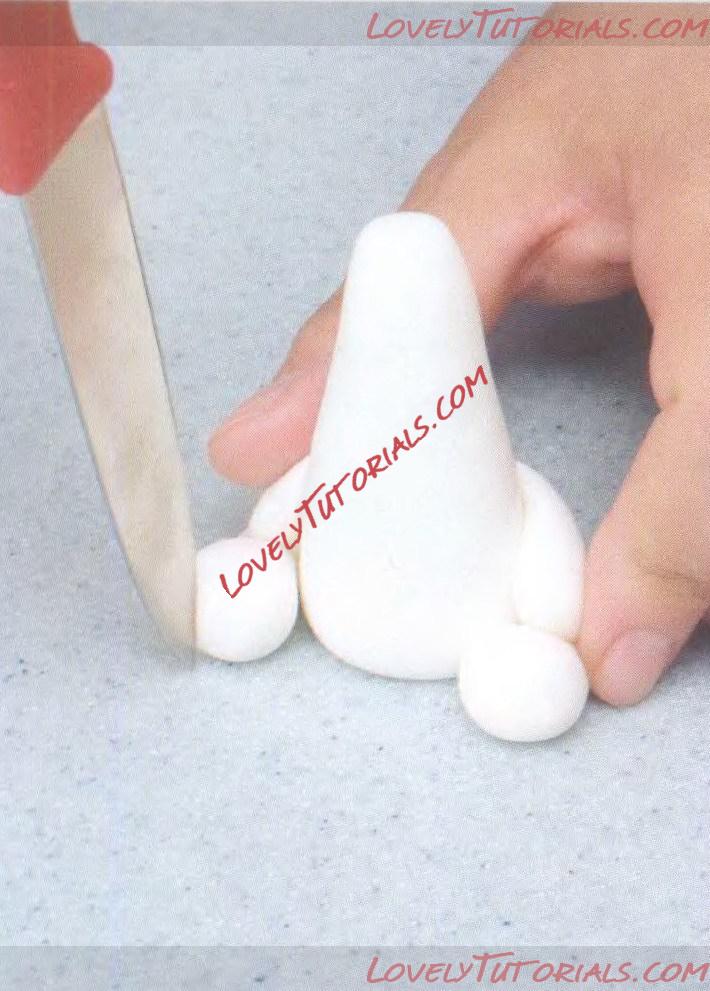
5 Make markings in the front of the paw with a knife.
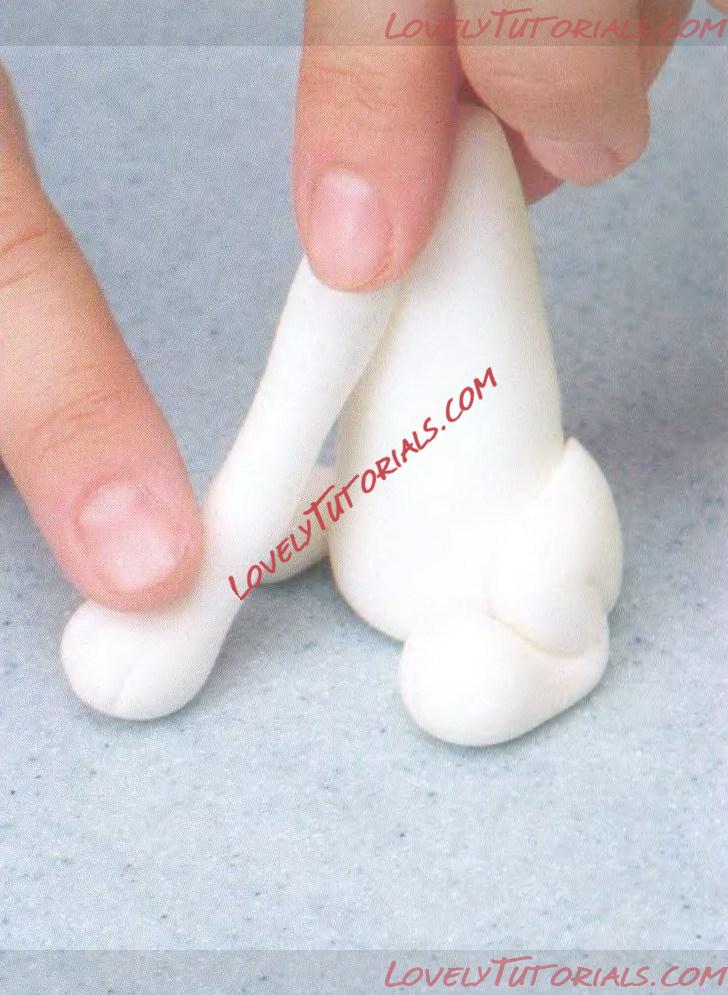
6To make the front legs, split 10g modelling paste into two. Roll one leg into a sausage, keep both ends rounded as before. Make markings in the paw as before and flatten the other end slightly. For the straight leg, glue into position pulling the paw slightly forward. For the white cat, make only one leg at this point.
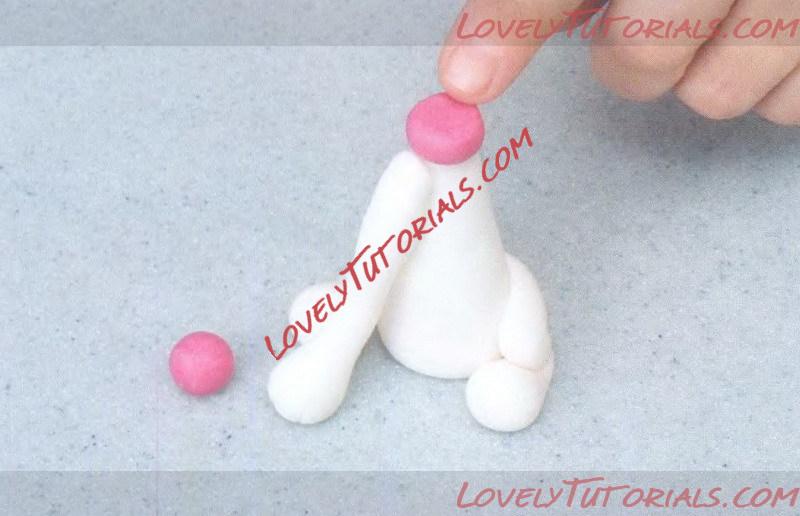
7 Roll a ball of pea sized pink paste and flatten onto the neck. For extra support, push a piece of dried spaghetti down into the centre of the neck and leave 1/2in protruding.
Keep modelling paste in a self-sealing bag when not in use to stop the paste from drying out.
Cut your shape templates from ordinary paper and laminate. Your template will be wipeable and can be used over and over.
Roll 500g of modelling paste into a sausage and cut into 3 smaller pieces. Wrap each one individually with clingfilm and store in a self-sealing bag. The smaller pieces are easier to bring back to a pliable state to use when required.
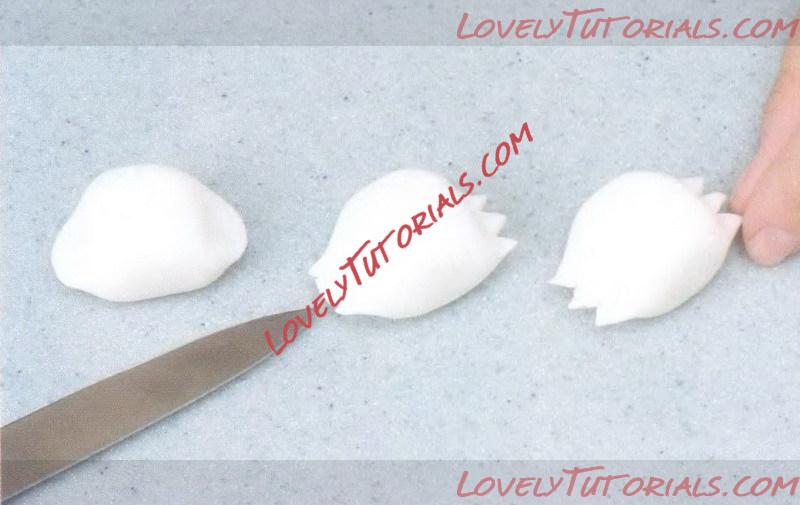
8To make the head, use approximately 15g of modelling paste and roll into an oval shape. Flatten slightly. Pinch the paste at either side of the head. Make two small cuts into these areas as shown, pinching each small section into a point.
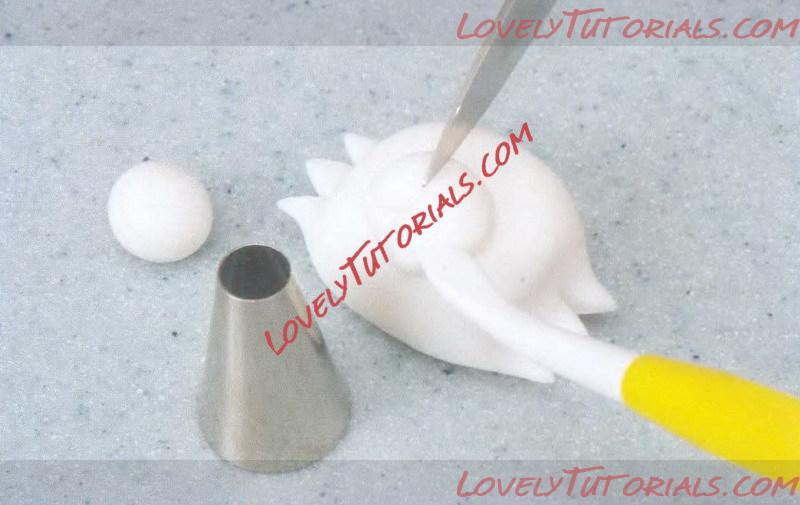
9 For the muzzle, attach a pea-sized amount of white paste onto the face. Mark from the centre of the muzzle to the tip of the nose with a knife. Use a No. 12 piping tip to push into either side of the straight line to create a smile. Use the wide end of the leaf veiner to push into the centre of the mouth and pull down slightly to create a small opening.
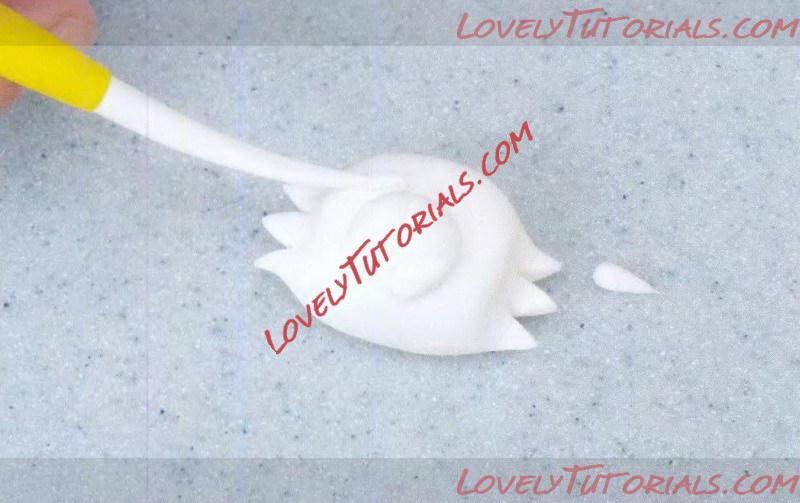
10 Hollow the eye area with a small ball tool. Fill the hollows with teardrop shaped paste and flatten slightly. Use the sharp end of the leaf veiner to make an indent along the bottom edge of the eye. Use the small ball tool to open one eye a little. Make two eyebrows from tiny teardrop shapes and place along the top of each eye. Dust the cheeks with fuchsia pink dusting powder.
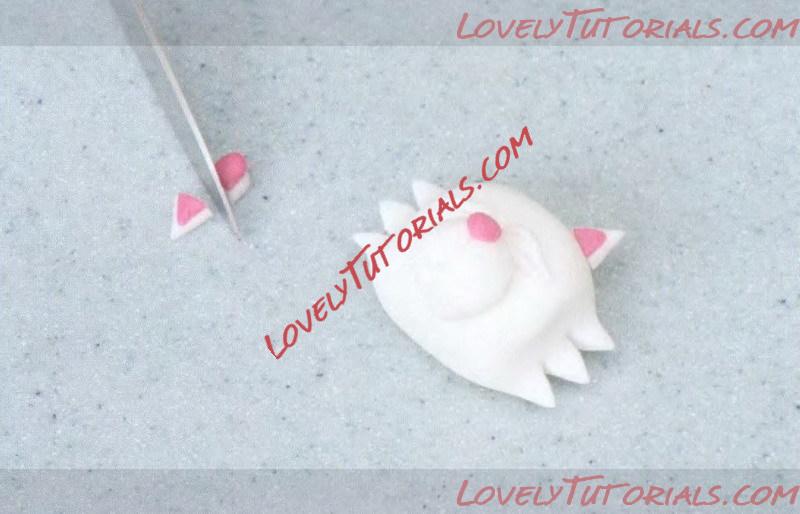
11 To make the ears, roll two small teardrop shapes with white paste and two smaller teardrops with pink paste. Flatten all of the shapes. Glue the pink on top of the white to leave an outline of white. Cut the rounded end from each ear and glue into position. Roll a tiny ball of pink paste and glue onto the nose area. Place a tiny tongue inside the mouth from pink paste rolled into a teardrop.
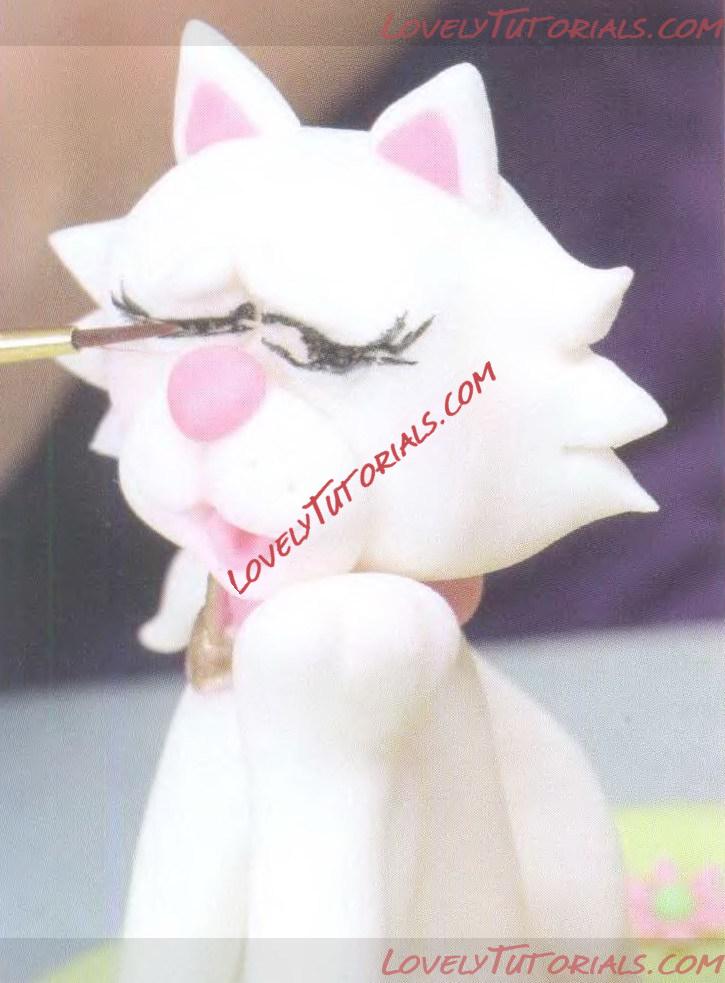
12 Paint the eyes with liquorice paste colour mixed with a little clear alcohol. Make the second front leg as before, bend in the centre to pull forward, place the paw onto the chin and glue into position. Make the tail with 10g of paste. Roll into a long teardrop shape, attach the thick end with glue to the body and twist the end of the tail to a point.
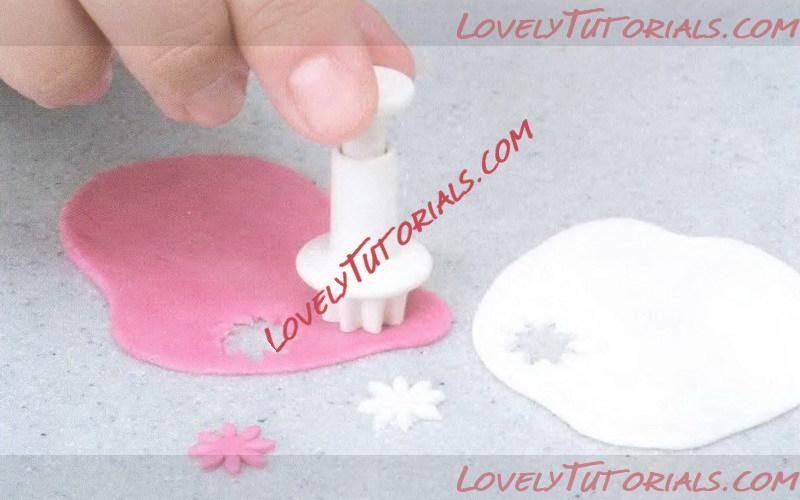
13 Roll a small amount of pink and white paste, cut several small daisies from each.
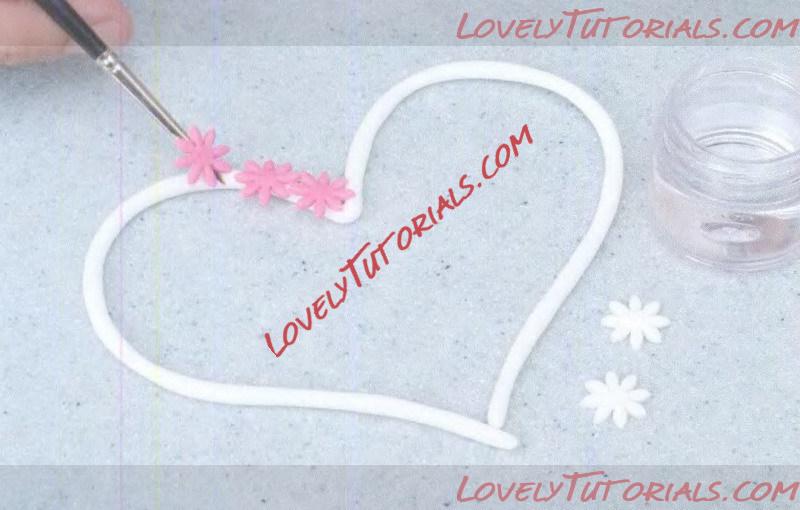
14 Attach the daisies onto the dry heart shape until completely covered. Cut small circles of green paste to fill the centre of each daisy.
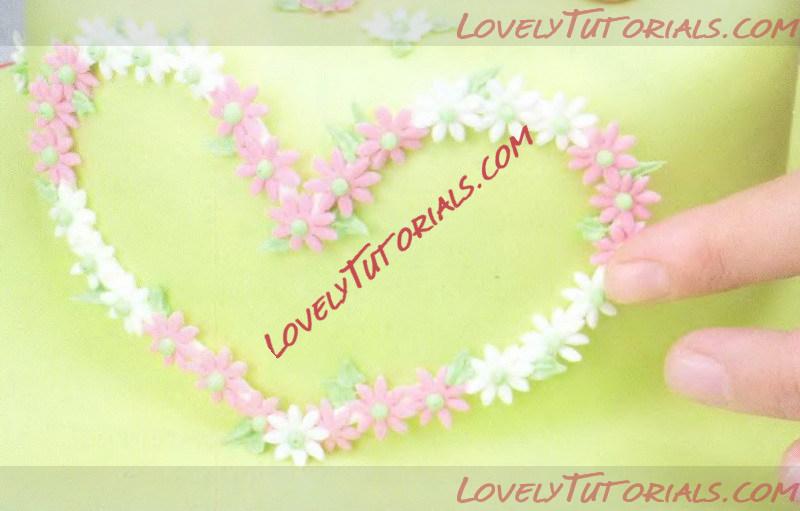
15 Place the heart onto the front of the cake and glue into position carefully.
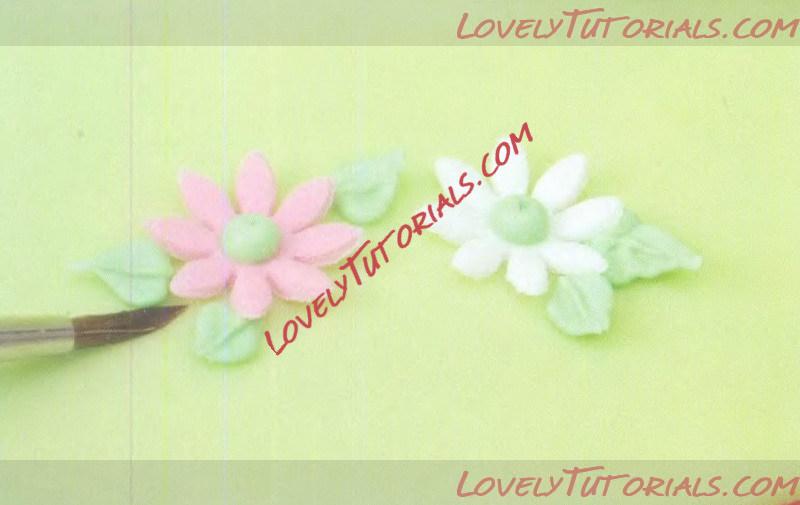
16 Add a few daisies onto the cake for decoration, use green paste to make leaves. Alternatively you can use a leaf tube and add the leaves with royal icing.
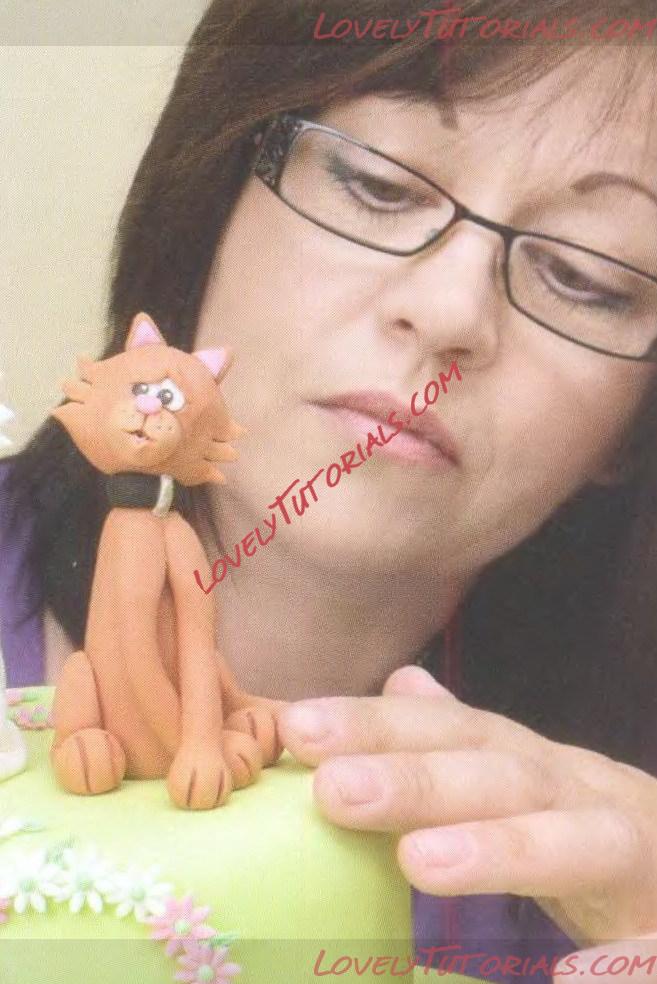
17 Colour 80g of white modelling paste with chestnut to make the second cat. The chestnut cat is made as instructed above and position the front legs as shown. To make the eyes, hollow with a small ball tool and fill with tiny balls of white paste. Cut two circles of black paste with a small piping tip and place onto the eyes. Dot each with a little white dusting powder mixed with alcohol. Add the eyebrows and finish off dusting the paws and muzzle with apricot dusting powder to highlight.
|
 |
|
Метки
|
3-d, 3-д, 3d, 3d figures, 3д, addım-addım təlimat, adım, adım adım yönergeler, artesanatos passo a passo, bemutató, birthday cake, biscuit, bolando bolos, bolo, bolo de noiva, bolos decorados, bonecos de biscuit, braut und bräutigam, bride, bride and groom topper, bride figurine, brud og brudgom, brudeparet og glam, bruiloft beeldje op de taart, bryllup figur på kagen, bryllupskake, cake, cake decorating, cake decorating techniques, cake topper, cake toppers, cake tops, cerâmica plástica, character figures, characters, children's cake, cold porcelain, como fazer passo a passo biscuit topo de bolo noivinhos, confeitando bolos, corpo noivos esculpido em isopor, curso de modelado, cвадебный торт, decoracion de pasteles, decoración de tortas, decorada en fondant, decorare le torte, decorazioni, deko fondant, dekorace na dort, dekoracija, dekoracije, dekorasyon, dekorácie, dort, especializada em modelagem de biscuit, estatueta noivos em porcelana, estatuilla del pastel de bodas, fender, figur bryllupskake, figur for bryllup kake, figur kager, figuras, figure making tutorials, figuren, figures, figurice, figurice od fondana, figurine de gâteau de mariage, figurine de mariage sur le gâteau, figurine on the cake, figurines, figurinhas, figurky, figurky nevěsty a ženicha určené na svatební dort, figúrky, figür modelleme, fimo, fixando a cabencinha, flower paste, fondan, fondant, fondant wedding couple how to, fondente, fondente di zucchero, forskjellige bryllupskake-figurer, fotopostup, foundant, gatos, gatti, gebak, glazuur, groom & bride wedding cake topper, groom and bride figurine, gum pasta, gum paste, gumpaste, gâteau de mariage, hand-made, handmade, hochzeit figur auf dem kuchen, hochzeitstorte, hochzeitstorte figurine, hochzeitstorten figur, honey moon, how to, how to make dress for bride, how-to's, instrucţiuni, instrukcijas, instrukcje, jak na, kage dekoration, kagedekoration, kake, kakebaking, katte, katten, katter, katzen, kačių, kediler, kissat, korak, korak za korakom navodila, korak-po-korak upute, koristeet ja koristelu, koty, kočky, krok, krok po kroku, krok za krokem, krok-za-krokem, la modélisation, las instrucciones, las técnicas, le tecniche, les chats, les techniques, los gatos, los novios, lukie, luna de miel, macskák, marcipanové figurky, marido i mujer, mariée et le marié, marshmallow, marsipanfigurer, masa flexible, master-class, master-klasse, master-klasy, matrimonio, mačke, mačky, meistras klasės, mermaid, metodikas, mistr třídy, modelado, modelagem, modelando a barriga, modelando a cabencinha, modelando a perninha, modelando as maozinhas, modelando o cabelinho, modelando o corpinho, modelando os bracinhos, modelando os pezinhos, modelare, modelerte figurer, modeling, modeling paste, modeliranje, modellazione, modelleme, modellering, modellieren, modellierpaste, modelling, modelling past, modelləşdirmə, modelovanie, modelování, modelowanie, motivtorten, nevěsta a ženich, noiva sereia, noivinhos, noivinhos de biscuit, noivinhos topo de bolo, noivos de biscuit, noivos para topo de bolo de casamento, noivos personalizados, návod, návody a postupy, návody na květy a lístky, opplæringen, orelhas, ozdoby, pamoka, pap, pap noiva, par de noivos, pas, pas-cu-pas, paso, paso a paso, passo, passo a passo, passo-a-passo, passo-passo le istruzioni, pasta de goma, pasta de miel, pasta flexible, pasta laminada, pastel de bodas topper figurita, pintura dos olhos, pisici, pocelana fria, polymer clay, poročna torta, postupak za ukrasavanje, pravljenje figurica za torte, pâtisserie, předměty z marcipánu, schmelzend, schritt für schritt anleitung, schritt-für-schritt, schritt-für-schritt-anleitungen, sculpting, soggetti, souvenirs, souvenirs de bodas, sposa, sposi per torta nuziale, sposini, sposo, stap, stap-voor-stap, stap-voor-stap instructies, statuina, statuina per torta nuziale, steg for steg, steg-för-steg-instruktion, step, step by step, step-by-lépésre, step-by-step, step-by-step instructions, styrofoam, sugarcraft, sugarpaste, suikerglazuur, svadobný párik, svadobná torta, svatební dort, svatební figurka na dort, technieken, techniken, techniki, techniky, technikák, techniques, tecnicas de decoracion, tecniche, tehnici, tehnike, teknikker, teknikler, telgopor, topo de bolo, topo do bolo, topos de bolo, toppers, torta, torta de la boda, torta nuziale, torte, torte decorate, torten dekorieren, torti, toy keks, trin, trin for trin, trin-for-trin, trin-for-trin instruktioner, trinn, trinn for trinn, trinn-for-trinn-instruksjoner, tutorial, tutorial de fabricação de noivos em biscuit, tutorial modelado pareja de novios, tutoriale, tutorias, tutorias/ideas para decorar los bizcochos, tutoriel, tutorijal, técnicas, udžbenik, ukrašavanje torti, uputstvo za dekoraciju, vestido noiva, wedding cake, wedding cake figurines, wedding cake topper "bride and groom" tutorial, wedding cake with sugar cats, wedding dress, wedding figurine on the cake, wedding figurines topper tutorial, weddong cake, zuckerfigürchen, zuckermasse, सजा केक, ट्यूटोरियल मास्टर वर्ग, कदम, कदम दर कदम निर्देश, तकनीक, मॉडलिंग, モデル, ケーキの上の結婚式の置物, étape, étape par étape les instructions, öğretici, 一步, 一步一步的指示術, žingsnis, žingsnis po žingsnio, 婚禮蛋糕上的雕像, 宗師級教程, 建模, 裝飾蛋糕, 黏土教程, 케이크에서 결�?�식 작은 입상, γάτες, βήμα, βήμα προς βήμα οδηγίες, γαμήλια τούρτα, οδηγίες βήμα βήμα, παντεσπάνι art, τεχνικές, φροντιστήριο, декорация на торти стъпка по стъпка, инструкция, котки, котак, кошек, как сделать, как слепить жениха и невесту из мастики -how to make fondant groom, как сшить платье для невесты, крок за кроком, крок за крокам, кішок, вясельны торт, покроково, полимерная глина, пошагово, пошаговые фотки, пакрокава, персонажи, миниатюра, мк, моделиране, майстор-класа урок, майстар-клас, майстер-клас, майстер-класи, маршмеллоу, мастика, мастер-класс, медовый месяц, жених и невеста, жених и невеста из мастики, лепка, ліплення, ручной работы, ручная работа, украшение тортов, свадебное платье, свадебная пара из мастики мк, свадебные фигурки на торт, свадебный костюм, свадебный торт, свадебный торт "влюбленные кошки", сватбена торта, сахарная мастика, уроки прикрашання, стъпка, стъпка по стъпка инструкции, торта стъпка по стъпка, техники, техника, техніка, туториал, туторіал, тэхніка, фигурки, фигурка на торт, фигурка жениха и невесты, фимо, фрак, фігурки, фігуркі, холодный фарфор, шаг за шагом, інструкцыя, інструкція  |
|

