|
|
МК лепка "домашняя птица" --Gumpaste (fondant, polymer clay) poultry and chops making tutorial
|

13.11.2011, 19:31
|
|
Администратор
|
|
Регистрация: 07.09.2010
Сообщений: 7,940
|
|
 МК лепка "домашняя птица" --Gumpaste (fondant, polymer clay) poultry and chops making tutorial
Огромная благодарность Автору за Мастер-класс
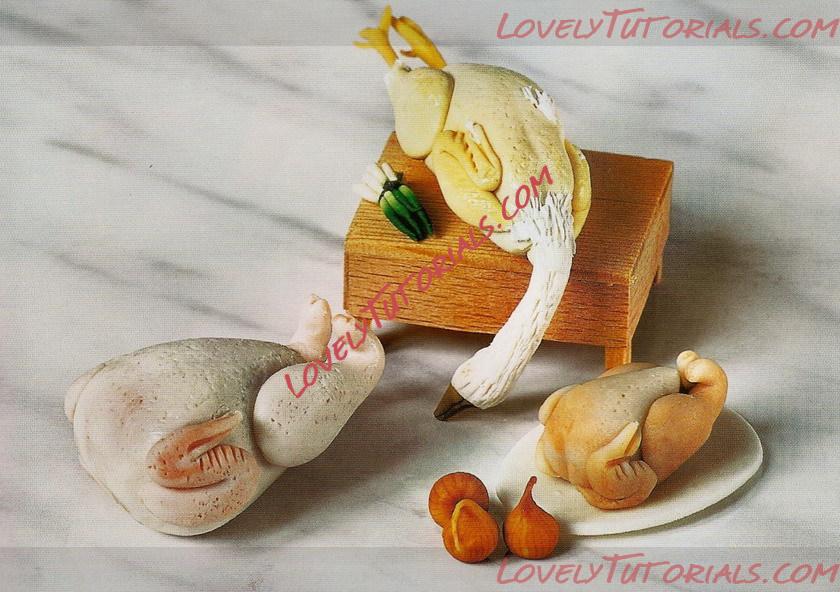
A simple cylindrical cane is the foundation for the techniques in this section, plus wrapping the canes in a thin, semi-transparent skin for added authenticity. The goose project also demonstrates how to make the separate elements in advance before assembling them into a whole.
Method
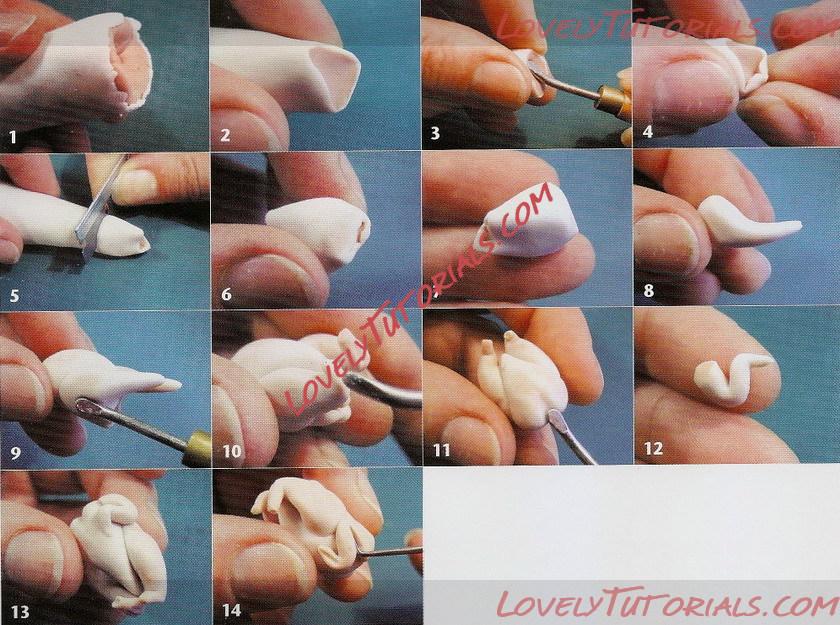
1 Make a simple cane,by wrapping your flesh pink mix with a very pale cream mix outer layer. Lengthen the cane until it is 1.5cm in diameter. Cut the cane in half and then lengthen one half until it is approximately 1cm in diameter.
2 Pinch the top end of the
cane together and the bottom upwards slightly to encourage it into a triangle.
3 Take a curve-ended tool and push it into this triangle to form a cavity.
4 Continue to squeeze the
edges together to make the opening a little smaller.
5 Cut the end of the chicken cane off at approximately 1.5-2crn
6 and 7 Gently ease the
outer skin of the cane over the other end to resemble a chicken carcass.
8 Using the narrower cane
to form a chicken leg, make a teardrop-like shape by narrowing and enclosing one end. Now cut off the cane and enclose the other end. Repeat this process for the second leg.
9 Press the leg fairly firmly
against the side of the carcass. With a curve-ended tool, press the underside of the widest part of the leg to help mount it more firmly to the body and give it a more authentic shape.
10 Bend the end of the leg
up at right angles. Score a line or two in the upturned portion of the leg for realism.
11 Press a line into the neck
cavity end.
12 For the wings, make two smaller, even-sized elongated 'teardrops'. Bend them into a Z shape.
13 and 14 Join them to the
chicken carcass the right way. making sure the widest part, the shoulder end, is at the top. As you work it, it will be quite obvious to you.
|

13.11.2011, 19:34
|
|
Администратор
|
|
Регистрация: 07.09.2010
Сообщений: 7,940
|
|
 Turkeys
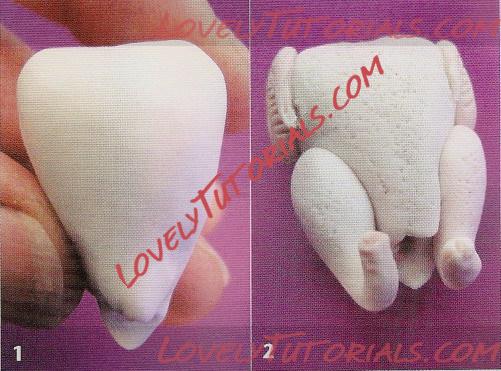
Turkeys are very similar to chickens in terms of general shape, but are .larger all over, particularly the breast, and the flesh is also slightly darker, with a purplish tinge. When making the basic cane, add a little of the basic raw meat mix and grey to give your flesh colour more realism.
Method
1 The technique is virtually the same as that for creating chickens, although you need to form the body into more of an elongated heart shape.
2 The finished turkey, ready
for display on the meat stall
|

13.11.2011, 19:36
|
|
Администратор
|
|
Регистрация: 07.09.2010
Сообщений: 7,940
|
|
 Geese
Geese
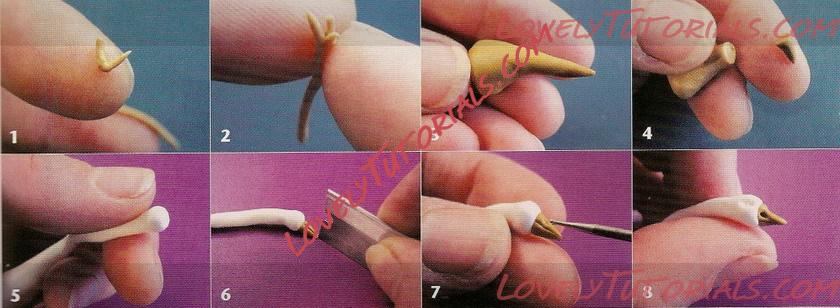
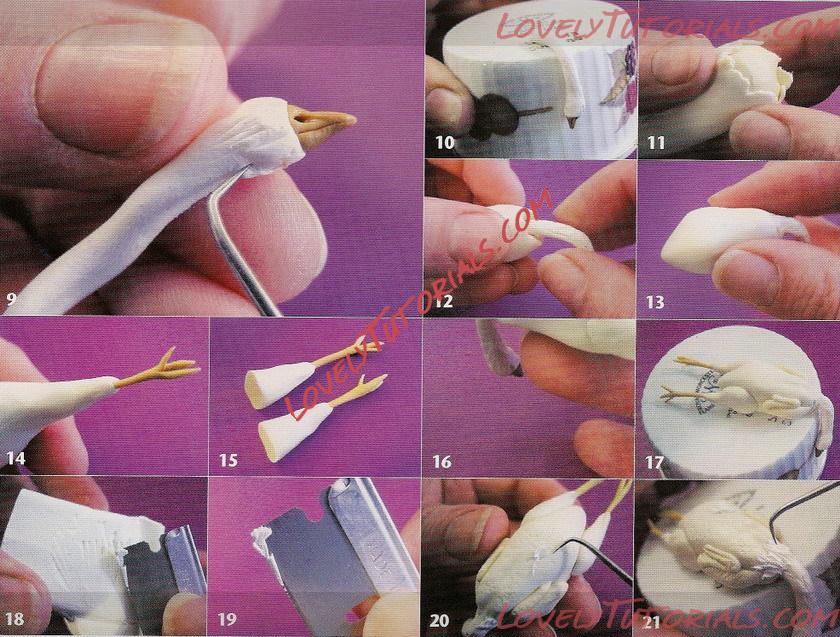
Method
1 and 2 Make up the legs
and feel by forming a V shape from a little roll of ochre and pale cream mix. Add a 5traight roll of the same mix and stick it together by gently rolling the join between your fingers. Make two of these (for each goose) and put them to one side on a ceramic tile or an ovenproof plate.
3 For the heak, form a little
more of the same mix into a cone .shape.
4 Cut off the end of the cone shape to a triangular
length no longer than about 5mm long.
5 For the long neck of the bird, take some white clay and make up a gently graduating tube with a ball-shaped end (for the head). Stick the beak onto the end of it.
6 With a blade, score through the beak so that it has the appearance of being able to open and close.
7 and 8 I'ress the ball-ended tool into the beak to form the nostrils and into the upper hall of the head on both sides to form the eye sockets. These may look a little macabre, so pinch them a bit to close them up.
9 With a dental tool, scribe short, irregular lines to give the impression of the bird's neck feathers.
10 Cut the head and neck off the bulk of the clay at approximately 3cm along. Lay the head over an upturned ramekin dish (or similar), or put straight onto a plate if you want to make a hanging goose. Set these in your oven along with the feet.
11 The plucked goose has a more yellowish character than chickens and turkeys, so make up a cane of cream mix wrapped with foundation colour mix 2 by the same method as the chicken.
12 Make a body, around the
same size or a little larger than the chicken, but not as large as the turkey. Add the now hardened goose head into the neck end and firm up the material around the join.
13 The goose's body is weighted more to the lower end so try to reflect this in your modelling,
14 and 15 Make the legs
from the same cane, but fairly small as goose legs are not at all meaty.
16 Attach the legs to the body of your goose.
17 Attach the wings by the same technique as for the chickens - with one slight difference - the wings of a goose are somewhat longer than the chicken or turkey.
18 and 19 This next step may take a little practice, and do exercise some care with the blade. Using the single-sided blade at 90' to a block of white clay, gently scrape tiny bits of clay from the block with a sort of picking motion. These white scrapings form the bird's feathers.
20 With your dental tool,
carefully transfer the feathers onto the body of the goose.
21 Add more feathers where the body meets the neck and the thin legs join the drumstick. Set the whole goose to harden in the oven.
|
 |
|
Метки
|
3d figures, acest site alimentare in miniatura, addım-addım təlimat, adım, adım adım yönergeler, alimentaires, alimentaires en miniature, alimente, alimento, alimentos em miniatura, alimentos en miniatura, artesanatos passo a passo, aves de corral, aves domésticas, baromfi, bemutató, birthday cake, biscuit, bolando bolos, bolos decorados, cake decorating, cake decorating techniques, cake topper, cake toppers, cake tops, cerâmica plástica, character figures, characters, chicken, children's cake, cibo, cibo in miniatura, co miniaturowe żywności, cold porcelain, comida, confeitando bolos, csirke, curcani, curso de modelado, decoracion de pasteles, decoración de tortas, decorada en fondant, decorare le torte, decorazioni, deko fondant, dekorace na dort, dekoracija, dekoracije, dekorasyon, dekorácie, dindes, drób, drůbež, díky miniaturní potravin, especializada em modelagem de biscuit, fazer comida em miniatura, fender, figur kager, figuras, figure making tutorials, figuren, figures, figurice, figurice od fondana, figurine on the cake, figurines, figurinhas, figurky, figúrky, figür modelleme, fimo, fixando a cabencinha, fjerkræ, fjäderfä, fjærkre, flower paste, fondan, fondant, fondente, fondente di zucchero, food, fotopostup, foundant, frango, gansos, ganzen, gebak, geese, geflügel, gevogelte, gjess, glazuur, gum pasta, gum paste, gumpaste, gør miniature mad, gâşte, gäss, gæs, gör miniatyr mat, gęsi, gıda, hand-made, handmade, hanhet, het maken van miniatuur voedsel, hogy miniatűr élelmiszer, how to, how-to's, hrana, huhn, husi, husy, hydina, indyki, instrucţiuni, instrukcijas, instrukcje, jak na, jedlo, jídlo, kage dekoration, kagedekoration, kakebaking, kalakutai, kalkkunat, kalkoenen, kalkoner, kalkuner, kana, kazlar, kip, korak, korak za korakom navodila, korak-po-korak upute, koristeet ja koristelu, krok, krok po kroku, krok za krokem, krok-za-krokem, krůty, kurczak, kurča, kuře, kyckling, kylling, kümes hayvanları, la modélisation, la volaille, lage miniatyr mat, las instrucciones, las técnicas, le tecniche, lebensmittel, les techniques, libák, lukie, machen miniatur nahrung, mad, maistas, making miniature ruokaa, marcipanové figurky, marshmallow, marsipanfigurer, masa flexible, master-class, master-klasse, master-klasy, mat, meistras klasės, metodikas, miniatiūriniai maisto, miniatur, miniatur-lebensmitteln, miniatura, miniatura alimentare, miniature, miniature mad, miniaturní potravin, miniaturowe żywności, miniatuur, miniatuur voedsel, miniatyr mat, miniatyyri ruokaa, miniatúrne potravín, miniatűr élelmiszer, minijatura, minijaturne hrane, minyatür gıda, mistr třídy, modelado, modelagem, modelando a barriga, modelando a cabencinha, modelando a perninha, modelando as maozinhas, modelando o cabelinho, modelando o corpinho, modelando os bracinhos, modelando os pezinhos, modelare, modelerte figurer, modeling, modeling paste, modeliranje, modellazione, modelleme, modellering, modellieren, modellierpaste, modelling, modelling past, modelləşdirmə, modelovanie, modelování, modelowanie, morky, motivtorten, naminiai paukščiai, návod, oche, oies, opplæringen, orelhas, ozdoby, pamoka, pap, pas, pas-cu-pas, paso, paso a paso, passo, passo a passo, passo-a-passo, passo-passo le istruzioni, pasta de goma, pasta de miel, pasta flexible, pasta laminada, pavos, perad, perus, piletina, pintura dos olhos, pocelana fria, pollame, pollo, polymer clay, postupak za ukrasavanje, poulet, pravljenje figurica za torte, preparar la comida en miniatura, pui, pulykák, pâtisserie, păsări de curte, předměty z marcipánu, rendere gli alimenti in miniatura, rendre la nourriture miniature, ruoka, schmelzend, schritt für schritt anleitung, schritt-für-schritt, schritt-für-schritt-anleitungen, sculpting, siipikarja, soggetti, souvenirs, stap, stap-voor-stap, stap-voor-stap instructies, steg for steg, steg-för-steg-instruktion, step, step by step, step-by-lépésre, step-by-step, step-by-step instructions, stvaranje minijaturne hrane, styrofoam, sugarcraft, sugarpaste, suikerglazuur, tacchini, tavuk, technieken, techniken, techniki, techniky, technikák, techniques, tecnicas de decoracion, tecniche, tehnici, tehnike, teknikker, teknikler, telgopor, topo de bolo, topo do bolo, topos de bolo, torte, torte decorate, torten dekorieren, torti, trin, trin for trin, trin-for-trin, trin-for-trin instruktioner, trinn, trinn for trinn, trinn-for-trinn-instruksjoner, truthähne, turkeys, tutorial, tutoriale, tutorias, tutorias/ideas para decorar los bizcochos, tutoriel, tutorijal, türkiye'nin, técnicas, udžbenik, ukrašavanje torti, uputstvo za dekoraciju, vištiena, voedsel, vďaka miniatúrne potravín, zuckerfigürchen, zuckermasse, सजा केक, ट्यूटोरियल मास्टर वर्ग, कदम, कदम दर कदम निर्देश, तकनीक, मॉडलिंग, モデル, ミニチュア, élelmiszer, étape, étape par étape les instructions, öğretici, 一步, 一步一步的指示術, žingsnis, žingsnis po žingsnio, žąsys, żywność, 宗師級教程, 建模, 裝飾蛋糕, κοτόπουλο, κάνοντας μινιατούρα τροφίμων, βήμα, βήμα προς βήμα οδηγίες, γαλοπούλες, οδηγίες βήμα βήμα, μινιατούρα τροφίμων, πουλερικά, παντεσπάνι art, τεχνικές, τροφή, φροντιστήριο, χήνες, домашни птици, домашняя птица, индейки, инструкция, как сделать, крок за кроком, крок за крокам, курица, курка, курыца, гуси, гусі, гъски, пиле, питание, покроково, полимерная глина, пошагово, пошаговые фотки, пакрокава, персонажи, принятия пищи миниатюрные, прийняття їжі мініатюрні, прыняцця ежы мініяцюрныя, пуйки, птиця, миниатюрни храна, миниатюрные пищи, миниатюра, мк, моделиране, майстор-класа урок, майстар-клас, майстер-клас, майстер-класи, маршмеллоу, мастика, мастер-класс, мініатюрні їжі, мініатюра, мініяцюрныя ежы, лепка, ліплення, ручной работы, ручная работа, украшение тортов, сахарная мастика, уроки прикрашання, стъпка, стъпка по стъпка инструкции, техники, техника, техніка, туториал, туторіал, тэхніка, фигурки, фигурка на торт, фимо, фігурки, фігуркі, холодный фарфор, харчаванне, хатняя птушка, храна, шаг за шагом, індички, індычкі, інструкцыя, інструкція, їжа  |
|

