Огромная благодарность
carlbayercakes за Мастер-класс
When it comes to tall cakes there is one major rule. Cake does not hold up well when you stack it up and needs help. I used two different techniques to help keep the cake stable. First, I use a wood dowel through the middle of the cake layers, this dowel is also glued to the board. The second technique required building a Plexiglass box for the base of the cake, this would insure that the cake did not blow out at the bottom and crush itself from the weight of all the top layers of cake. I of course learned after one failed attempt at stacking the cake layers that it would not be able to support itself. I had figured that because the cake layers were fairly small square pieces of cake that it would not be a problem. The first indication that it was a problem, was when the cake collapsed at the base, which is a pretty good indicator, don't you think?
How To Keep The Cake From Crushing Itself
I went back to the drawing board and decided to go with the Plexiglass box to hold the cake in place. It seemed like the only way that would not only hold the cake in place, but also be safe for cake to touch it without worry of any type of contamination. This was for a boy's first birthday party and I did not want there to be any worries. Designing cakes can take some practice, especially when there are other circumstances, like a babies first birthday. It made the most sense to use Plexiglass as it is also an easy material to cut, and it is rigid when glued into a geometric shape (I knew my engineering would come in handy some day).
Building the Plexiglass box was as simple as measuring the width and length of the big one cake and cutting the Plexiglass to these dimensions. Before I forget, the Plexiglass I used was approximately 1/32 of an inch thick. You can get this type of material at any craft store (I got mine from Hobby Lobby). I like to use a hobby knife (X-Acto Knife) with a #11 blade to make the cuts. The good thing about materials like Plexiglass, is that you only have to score them a couple times and then bend them at the cut line. The Plexiglass will break cleanly at this line and you don't have to cut all the way through, which is a good thing.
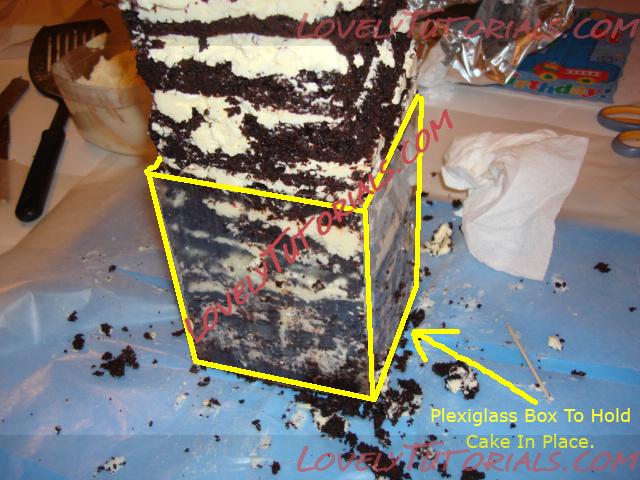
After cutting the sides for the box, I also made a bottom. The cake probably would have been fine if I had pushed the cake around the box, but I wanted to make sure it really was rigid enough to hold the cake. So I cut out a piece for the bottom and used a hot glue gun to create the Plexiglass box. A hot glue gun has become an indispensable tool for cake making, for me anyway. I like its instant curing and its safe to use for food items (I looked into this before using it on my cakes). The box turned out great! If you look at the picture below you can see the Plexiglass box around the cake (I highlighted it in yellow. Please excuse the cake crumbs). You can't see it in this picture, but there is also a 1/2" wood dowel through the middle of each piece of cake layer.
That sums up the building of the box, in the next part, we will look at how I put the layers of cake, cut the cake and began sculpting the sides of the cake.
 How To Add Cake Layers Onto A Wood Dowel
When it comes time to start building your cake, you want to think ahead. You cannot just start placing layers onto a dowel without first making sure that you know the size of cake to place on the cake. The solution to accurate cake placement is in two parts. First, you want to measure each piece of cake and cut it to the correct size square (which for this Big One Birthday Cake, was the shape I wanted). In this case I measured a 5 X 5 inch square piece of cake. I want to also add that cake can be a bit inaccurate, let's face it, it is cake after all. I also make each piece about 1/2 bigger to give me some wiggle room (you know, in case you make a mistake).
By the way, each cake piece was cut from a 9 X 13" sheet cake. I measure each sheet cake to get the maximum amount out of it. In this case I got 2 squares from each cake, but remember that each square is going to be cut in half to allow for a layer of butter cream frosting as well. Make sure you remember this too when you are planning on the number of cakes you need for a cake. The frosting adds quite a bit of thickness beyond just the cake layers.
So after I have all my 5 X 5 squares, I begin marking the center of each one with a chopstick (I poke a hole through each cake square so I know where to place it on the wood dowel. We have a lot of layers to pile up and we want to stay as accurate as possible. Now that the tedious work was done, I could begin placing each cake square on the wood dowel. When I put each cake layer into the Plexiglass box, it cut the cake sides perfectly (and also made a mess, that is why you see the wax paper covering the blue wood base). Before laying a layer of cake into the Plexiglass box, I made sure to frost each one with Swiss meringue buttercream frosting. Otherwise I was going to have to try and frost it inside the box and that wasn't happening.
As you can see in the picture, the stacked layers of cake got very high. If I had not placed a dowel through the cake, they surely would have started tilting to one side. Without the Plexiglass box the cake would have crushed itself, as I have said at least 4 times before this, but it is important and I don't want you to have to go through the same mistake I made.
 How To Build The Big One Birthday Cakes "Nose"
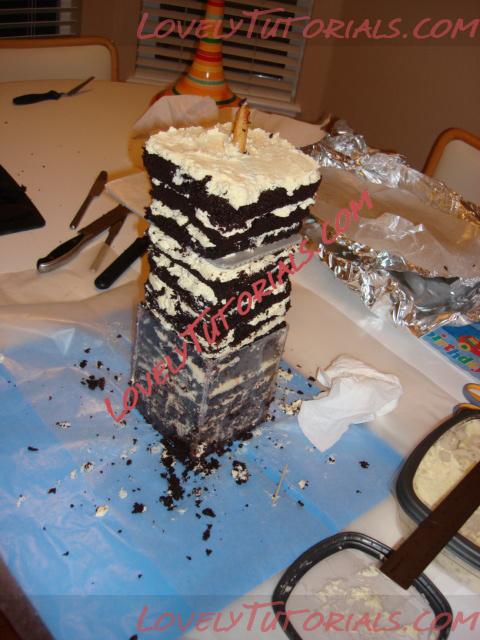
You might be wondering what I mean by "nose", I simply mean the part that sticks out at the top of the one, you know the little part that most of us do not bother to add when we write the number 1 (see there it is!). This part was made from a piece of cardboard (thick cardboard, about 3/8 of an inch thick). I went with cardboard instead of MDF (medium density fiberboard, which is amazing stuff to work with), because I knew the layers of birthday cake for the Big One Cake would not bend the cardboard. If you look at the first picture you can see how the cardboard piece was made. It was big enough to be covered by the layers of cake, and this was critical as this would be what keeps the weight of cake on the "nose" from tilting or sagging. You will also notice that I have cut a hole in the cardboard and this is so that it also is anchored by the wood dowel. Just another insurance package to keep the cake together. Notice I also covered the cardboard with wax paper to prevent it from becoming soaked by the oils and butter in the cake and frosting.
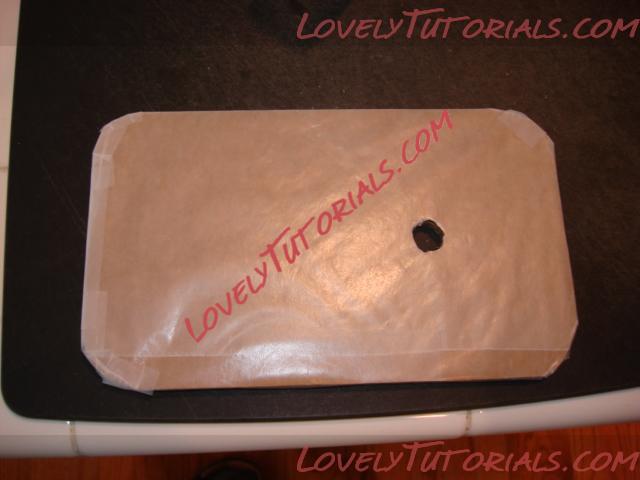
You can see by the second picture that the cardboard is in place and is now held in place by the layers of cake on top of it. I was now ready to add cake to the "nose" of the cake. These would also be 5 inch wide pieces of cake to match the body of the big one. I would carve the "nose" and create the curve shape with frosting later. Right now it was ready for the cake layers that would create the basic shape.
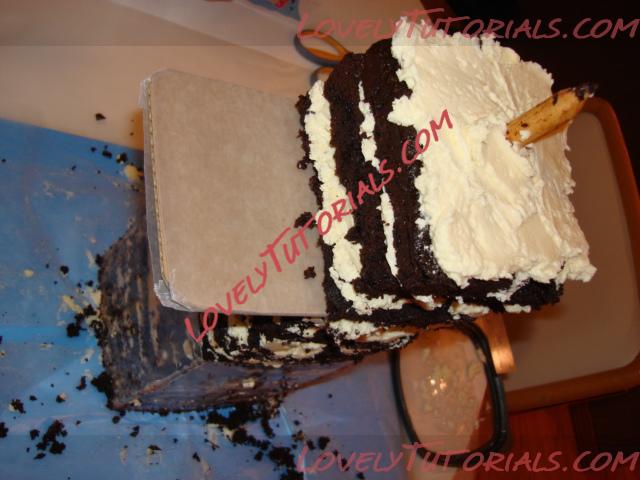 Adding The Sides And "Nose" To The Big One Birthday Cake
Now you can see the "nose" cake layers added to the big one birthday cake in this picture below. You may also notice that I started adding a layer of frosting that would become the curved shape for the big one birthday cake.
Now with the hard part done, I was able to put my energies towards building the rest of the big one birthday cake. Completing the cake sides was easy enough, I added a few layers of cake that were also 5 inches wide and about 5 inches long. I would be curving all the sides of the cake to give it a really smooth look. You may also notice that while I was working on the sides of the big one cake, that I made sure to cover the rest of the cake with plastic wrap. I had a customer comment once that their cake was dry, and after looking back at the decorating process for the cake I noticed that I had forgotten to cover the cake while working on different parts, and yes, it had dried out the cake. So now I remember to keep that cake covered until I get the crumb coat placed on the cake.
A crumb coat is simply a layer of frosting that holds any crumbs in the frosting. This is an important step that must be done if you are to have a smooth and crumb free layer of final butter cream frosting or icing.
As I was saying before, I added the sides to the cake and prepared them for carving rounded corners.
At this stage the cake itself was ready for the final step, sculpting and carving the cake to its final shape. Shaping, carving, sculpting cake is an art for in itself. It sets the stage for what your final cake will look like. It is one of the most important steps when finishing a cake. When completing the big one cake, I use a big ruler to hold up to any side that I wanted to keep straight. I then take a long bladed, serrated knife and, in a sawing motion, cut off the excess cake that I no longer need.
When it comes to carving curves you mostly have to eyeball it. I guess you could make a template from the object you are designing the cake around, but then you have to remember to scale it for the cake. I just eyeballed the curves I wanted by referencing the pictures I had of a Big Number One. Honestly, it is so much easier to just cut it by hand.
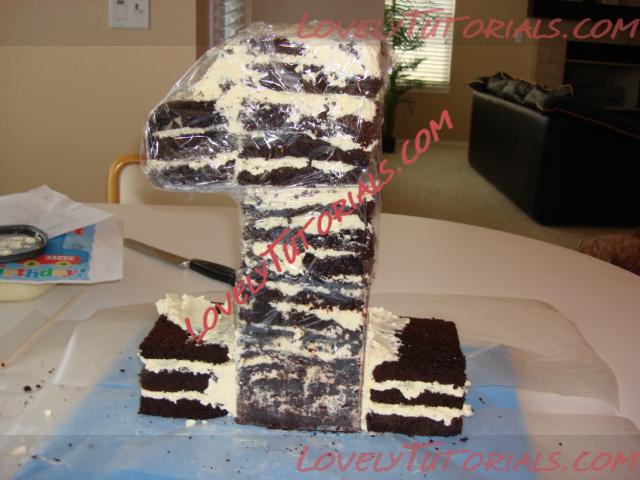 Preparing The Big One Cake For The Final Buttercream Frosting Layer
I know that there are a lot of steps that I have not covered in this cake making post, like how to make butter cream frosting, how to bake sheet cakes and what type of food coloring to use for coloring your frosting. I have instead left these steps till another post specifically about each of those topics. I think that will be better than taking away from the actual building of 3d cakes like this "one".
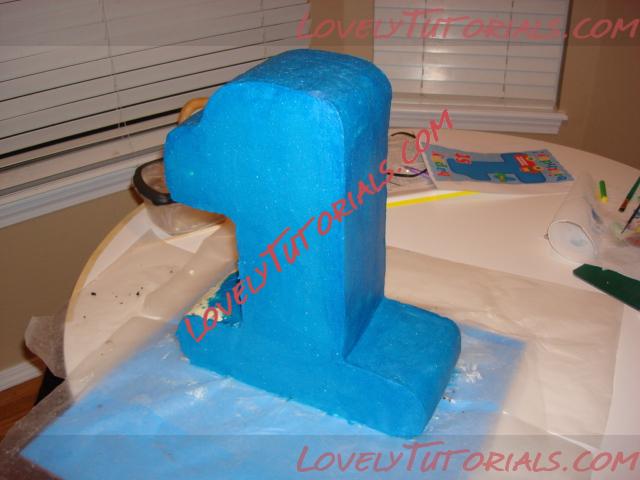
At this stage of the cake decorating phase, I have already applied the crumb coat layer to the whole cake. You can see the crumb coat layer of frosting, it is the white layer at the base and side of the cake and you can see crumbs have been "locked" into that frosting layer. The rest of the cake was covered with the final layer of Swiss meringue butter cream frosting, it was dyed baby blue to match the theme.
You can also see that I have rounded all the corners, as I had mentioned previously. Smoothing the frosting demands patience and lots of practice. You also need to use the right tools, without the right tools you cannot hope to get a smooth finish. I like to use a Wilton cake spatula. It gives you better control and more precise spreading. Swiss meringue butter cream frosting is easily spread, but it requires a continuous smooth motion, you have to plan your path of motion and try not to stop in the middle of your cake. I also recommend not using very much pressure, you want just enough to push the frosting, but not bulldoze through it. You also want to angle the blade of the spatula so that you only use one side of it, you are only smoothing the frosting not removing it. If you use one edge of the blade to smooth cake frosting, then you will have much better success.
I can go on and on to try and teach how to frost a cake with icing or frosting, but I will save that for another post, I also cannot keep going on as there is still more to this cake that I need to finish up.
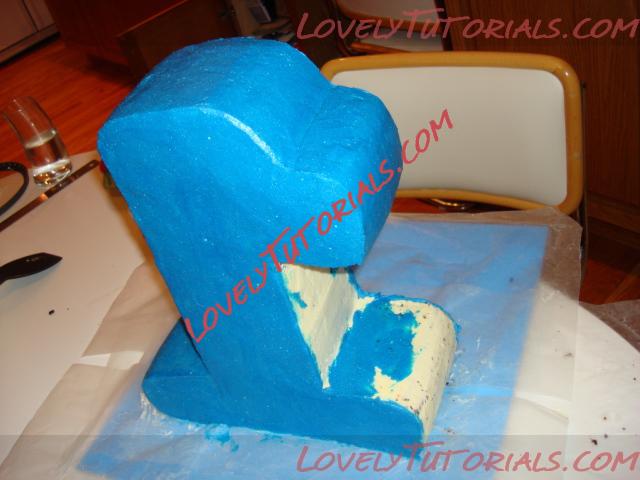
Just one more picture of the cake frosted taken at a different angle, for your viewing pleasure and reference. Did you notice the picture of the one in the background. That was the inspiration.
 Adding The Finishing Touches To Make This First Birthday Cake A Show Stopper
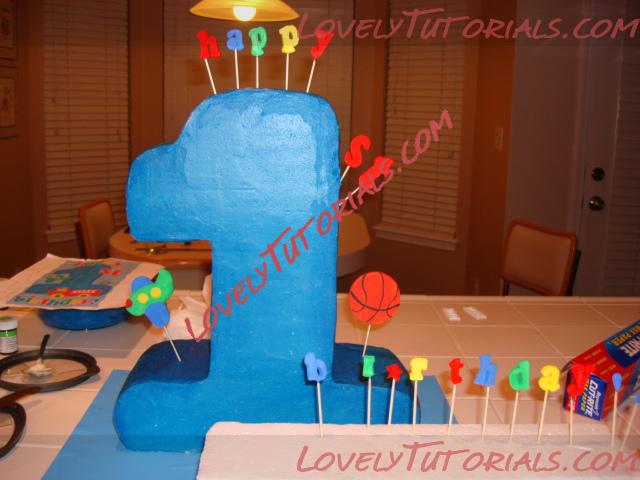
Now I was ready for the detailing of the cake. This is what makes your cakes look amazing and full of life. If you look at the picture below you will see a display of cut out letters a basketball and an airplane. These were created to add decorations to the cake and really make it stand out. I created all of these pieces from 1/4 inch Styrofoam board. I picked this up at my local hobby and crafts store, and cut out each piece using a photocopy image of letters and the basketball and airplane for the cake. These came specifically from the theme for the birthday party, and I just copied them and scaled them for my needs, after that it was as easy as using a hobby knife to cut around the templates.
The letters and other pieces needed some pop and so I painted each one to match the theme where they came from. I have to say that cutting out the letters was actually a bit of a challenge because when they were painted, if any imperfection was present, you could really see it after it was painted. I had to make a few of them over again as they were not up to my standards of perfection. I get a bit crazy when it comes to my cakes and I sometimes have to remember to take a break and look at the whole cake before spending too much time on one part.
Painting each piece was one of the more relaxing pieces to do for the big one birthday cake and I took time to make sure they were very vibrant and colorful before being satisfied with them, but it was because I really enjoyed painting them and seeing them come alive with color. I found that the easiest way to paint each one was to poke a toothpick into each one and paint it while it was suspended on the toothpick. I then let each one dry on a foam board. You can never have too much foam lying around. I highly recommend saving any that you get from a package or new appliance box.
After each piece was dry, they were ready for their own finishing touches, yes, there is still more to each of these pieces as well. I wanted to have each one seem as though it was floating about the cake, in order to accomplish this I came up with a simple solution…colored wire. You can pick craft wire like this at any hobby store. It comes in lots of colors which is great for matching your cake colors. I used a blue tinted color wire that was similar to my birthday cakes main color. I intended to wrap the wire around a toothpick and then stick the toothpick into the cake, while keeping the wire above. You can see the end result in the pictures below.
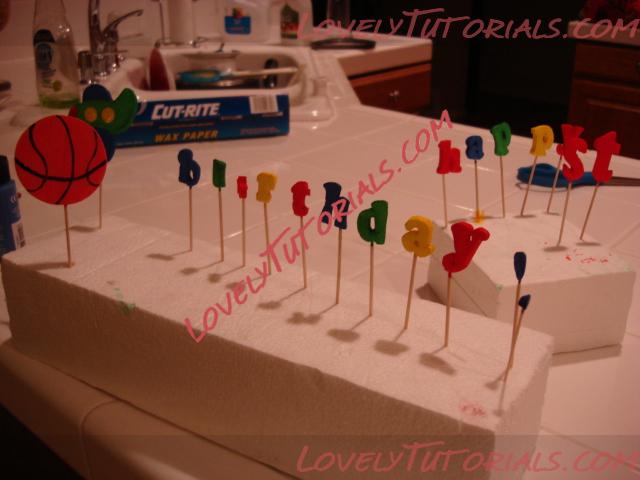
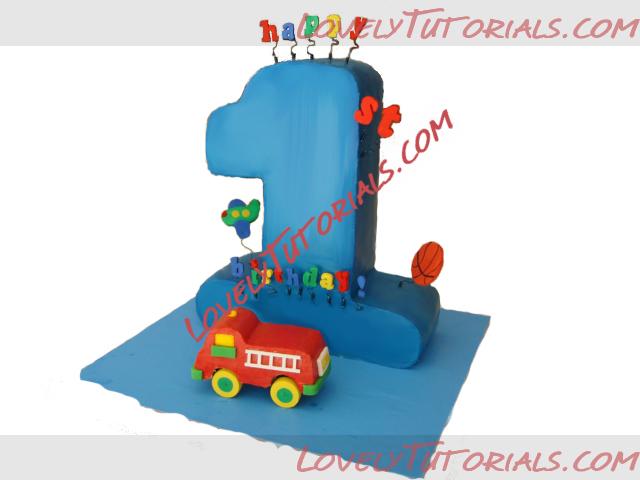
In this second picture you can get a better idea for what I had planned to do with the letters on the birthday cake. As I had mentioned, each letter would be suspended like you see, but with the blue wire. This gave it a whimsical feel and also made it seem as though the letters were floating about the cake by themselves. Pretty neat huh?
