Огромная благодарность dollmakersdream за Мастер-класс
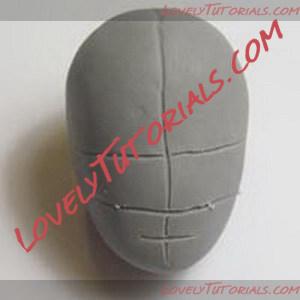 STEP 1:
 Roll an oval shaped ball of clay. This will be the basis of the face you will sculpt. The smoother you get this step, the easier your job will be. So take your time and make it right.
Divide the face with your rubber-tipped tool into sections. A vertical line down the middle of the face is your line of symmetry. A long horizontal line half way down the face is where the eyes will be. The second line down is the bottom of the nose and the third line down is where the opening of the mouth will be.
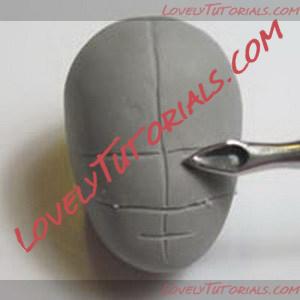 STEP 2:
 Using your spoon tool slowly work in hollows where the eye-sockets should be. Be careful with this step. You should be working slowly and very gently in small circling movements. DO NOT push the tool down in one motion or you will end up with a dent in the head the shape of your tool.
Using the rounded side of the tool will help with this matter. Keep the tool fairly flat on the face to ensure the tools point does not gouge the clay.
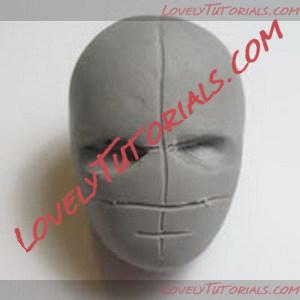 STEP 3:
 Note that the sockets are fairly deep. This will allow you to bring in the bridge of the nose later, and still keep the eyes further back. If you do not do this step deep enough, the eyes will stick out further than the nose.If you are unsure as to what depth to do the sockets, please read ahead before attempting it. Future pictures will help you decide what you will need to make way for later.
Be sure that the sockets sit under the guide line you drew in step 1.
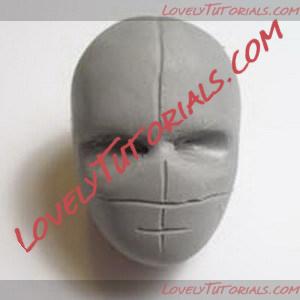 STEP 4:
 When you a practicing how to sculpt a face, be sure to keep smoothing your work as you go. Smoothing the clay will help you to spot mistakes as they occur, and not when you have completely finished a piece. Smoothing can be as simple as gently brushing the clay with your thumb. Be sure not to press too hard or you will squash the clay.
With the spoon tool, gently rub a ridge down where the bridge of the nose meets the brown line. Refer to the next picture for depth.
 STEP 5:
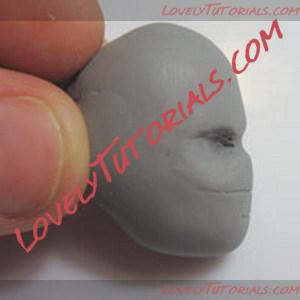
 When learning how to sculpt a face you need to study how the face works. A face is not flat, it has draft. This is precisely why we can see the eyes on a profile view. If the face was flat, we would not be able to see the eyes. Notice in this profile shot that the bridge of the nose comes in, but not as far as the eye sockets. This is creating draft. Compare your results so far with a photo reference to ensure the draft of the face is not too flat or too pronounced.
 STEP 6:
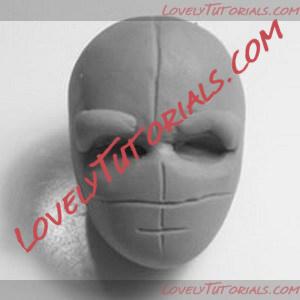
 Next you need to form the brow bone. Make two flat sausages of clay and place on the face, just over-lapping the top of the eye sockets. Notice how the brow line follows fairly straight along the top of the sockets and slightly down the side of the sockets. Be sure that the clay you have added is well kneaded, as the clay needs to be warm so it is easy to blend in the next step.
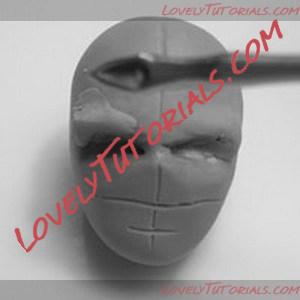
STEP 7: The next step when learning how to sculpt a face is to utilize your spoon tool again. Using the curved side of the tool, gently blend the brow. Do not blend it flat; you want to simply grab the edges of the clay you placed and blend it into the forehead. Barely touch the clay, just gently glide from the edge to the forehead. If you start to notice a hollow around where you are blending, you are using too much pressure. You want the forehead to stay intact, merely close the seam between the brow and the forehead.
 STEP 8:
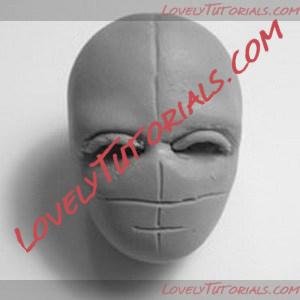
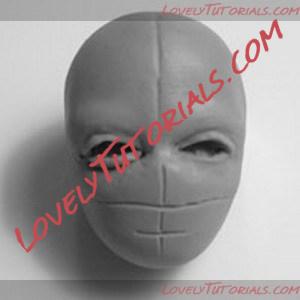
 Now you make way for the eyelids. This is preparing for a doll with large eyes. Place two small cylinders of clay just under the brow. Bring it in so that it's slightly deeper into the face than the brow. This will ensure the eyes appear to sit right into the face. Make sure that the eyelids end before the end of the brow bone.
 STEP 9:
 Using your rubber-tipped tool gently blend the eyelid into the brow bone. Don't blend it too much because you still want to have that crease where the brow meets the eyelid. You are simply smoothing the seam-line so it looks incorporated into the face.Repeat the process with the bottom eyelids. Keep in mind that the bottom eyelid slightly tucks under the top eyelid. Refer to your photo reference and compare carefully.
 STEP 10:
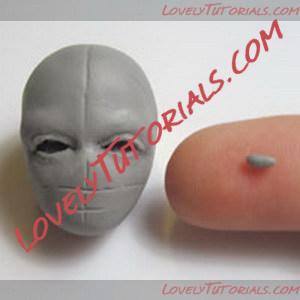
 This step gets very fiddly. Cut yourself a tiny piece of clay, this will be what fills in the eyeball. In the picture, the piece of clay is only a couple millimeters. You want the piece of clay to be so small that it will not damage the doll's eyelids when you pop it in. Hook the small piece of clay with your rubber-tipped tool and carefully place it into the eye socket. Move the clay so it spreads out forming the eyeball. You want it to be as smooth as possible.
 STEP 11:
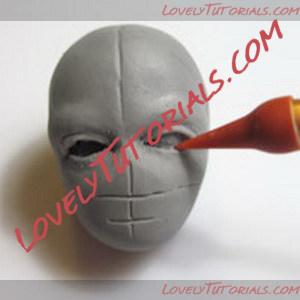
 Smooth the clay and try to form a slightly rounded surface. This part needs to be perfectly smooth or else it will look rough when you paint the eyes. You can use smoothing agents like Metholated Spirits, or something especially suited to smoothing polymer clay such as "Prosculpt Smoothing Oil". You can even use substances like baby oil. Simply apply the oil onto a soft hair paint brush and paint over the clay you wish to smooth.Whatever oil you use to smooth, be sure to only use small amounts. If you use too much, it can react with acrylics paints. Apply a very small amount of oil, and add more if required. Applying too much can also soften the surrounding clay, smoothing out your detail work.
 STEP 11:
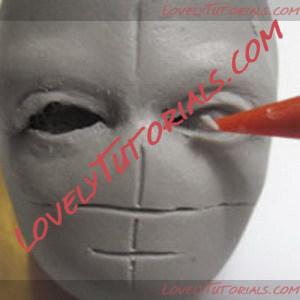
 Any gaps that are left, be sure to fill in with clay. Also, create a small ball of clay to form the red fleshy part in the inner corner of the eye. This part is extremely small. If you make it too large then the red will take up too much of the eye later. Smooth over any imperfections and ensure that the eyelids are perfect. Leave a small ridge on the bottom of the eyelid as this will be where you attach eyelashes later.
Repeat this process with the other eye.
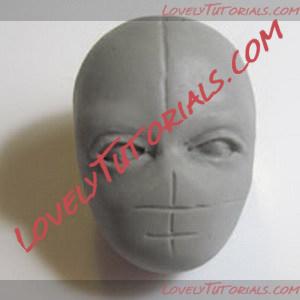
STEP 13: Smooth out the eyes and attempt to make them as symmetrical as possible. This is important. The eyes tend to be the first thing people notice when looking at a doll, so if they are obviously misaligned, it can hurt your chances of a sale.If you are finding it difficult seeing if the doll's face is symmetrical, try looking at it up-side-down or through a mirror. This tends to change your perspective enough so that you can see the error.
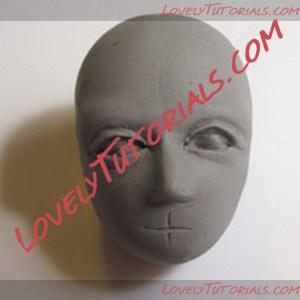 STEP 14:
 Create a narrow pyramid shape for the nose and blend onto the face. Note that the smaller end is at the top, slightly expanding out to the bottom of the nose.
Also, see how the bridge of the nose blends into the brow-line in line with the top eyelids. Be sure not to end the nose too high or low. Constantly refer to your photo reference.
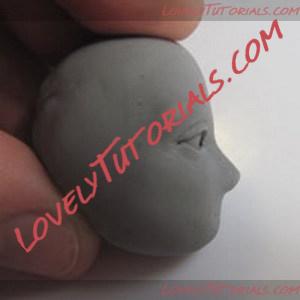 STEP 15:
 Here is a side view to show how the nose lays on an angle. In this instance I have slightly tilted the base of the nose upwards. If you tilt the nose downwards, you create a hooked nose. This tends to be used when sculpting older women, hags, crones or older men. A slightly upwards nose tends to make a woman look more feminine.
Do not tilt the nose too far upward or she will look like Michael Jackson.
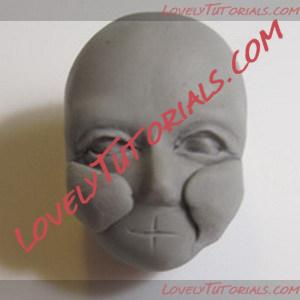 STEP 16:
 DO NOT punch in the nostrils yet. This step is done later. Now you can move onto the cheeks. We need to fill out the cheeks now, creating two small pancakes and applying them to where the "apple of the cheek" would be. Note that it's more to the front than the sides. If you add all the bulk to the sides of the face, she winds up looking like she has a flat face and huge cheekbones.
Butt the cheeks up under the bottom eyelids.
 STEP 17:
 Using the spoon shaped tool, go around the edges of the clay you just added to the cheeks and carefully blend it. You use the rounded end of the tool and GENTLY drag the added polymer clay into the face. You only want to move the edges of the added clay down to meet the face. If you push too hard you will create a recess in the face. Work at it slowly, working in small motions. After you've worked the polymer clay with your tool, do the final smoothing with a finger, just caressing the clay to smooth it, not pushing it, (it helps if you cut your nails short like I do, then you can blend with the tip of your finger giving you more control. More control is always best when you're still learning how to sculpt a face).
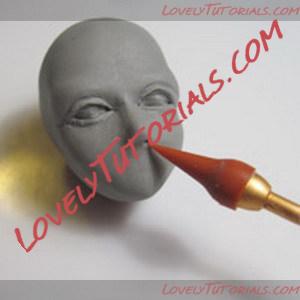 STEP 18:
 Sometimes I leave this step until after I have finished the mouth, but in this instance I'm doing it this way. Using the rubber-tipped tool, I have carefully pushed in the beginning of a nostril. Lean the head in a way that you can see under the nose easily. This will allow you to position the nostril easier. Make sure you compare to a photo referene to get the positioning right. It may look simple but a lot of doll makers struggle when trying to sculpt the nostrils correctly on their dolls.
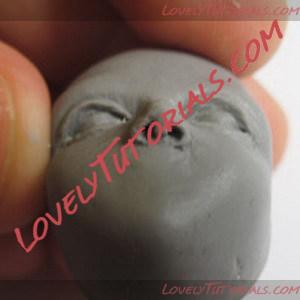 STEP 19:
 Create little tear-drop shapes for the nostrils with the pointed ends of the holes slightly pointing to the tip of the nose. Note that the outer nostrils are quite thin compared to the part dividing the two nostrils. A lot of people tend to make the nostrils too small and close together, and ultimately it tends to make it look like a piggy snout. Keep referring to your photo reference. Once you are happy with the size of the nostril holes, carefully tuck the outer nostril around the base of the nose. This will give the nostril some definition. The nose is quite a difficult thing to sculpt, so it would be good to practice on a scrap piece of clay a few times before committing to the doll you're working on.
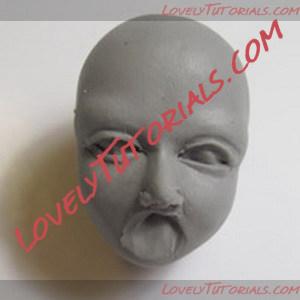 STEP 20:
 Try to get the nose to look as symmetrical as you can, but don't waste too much time on it right now. You can keep working on it before you bake the doll. When I teach how to sculpt a face; one of the things I stress the most is that you shouldn't spend too long on a particular facial feature. When you spend too long on something, your eyes tend to glaze over and you stop seeing your mistakes. This can potentially set you back quite a bit. Work on something, then once it's reasonable, work on the next area and come back to it later with a fresh eye. Now you need to make way for the mouth. Using your spoon shaped tool, create a hollow right around the mouth area, but be careful not to make it wider than you want your dolls mouth to be.
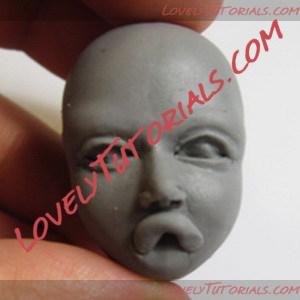 STEP 21:
 Knead some clay until it's warm and malleable. You want to be able to blend this without needing to push too hard later. Create a small sausage of polymer clay and add it to the face where you created that hollow in the previous step. It should sit nicely inside the hollow if you bend it into a horseshoe shape. This will form the entire top lip section right up to under the nose.
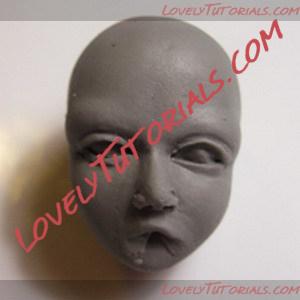 STEP 22:
 Using your spoon shaped tool, work around the top edge of the clay you just added and blend it into the face. Do not blend the bottom edge, you will use this to form the lip. Blend the clay so that it's seamless right up under the nose. Also, blend the sides of the "horseshoe" so the lip is more horizontal. Notice how I've somewhat trimmed off some of the clay I added. Gently smooth out and slightly flatten the clay. You don't want the clay around her mouth to protrude too much.
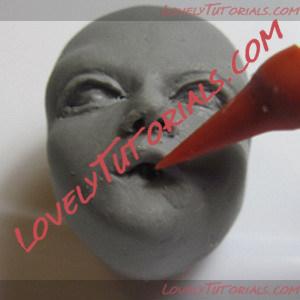 STEP 23:
 Using your rubber-tipped tool, gently wipe the under-side of the clay you added. Wipe it on a slight upward angle so it creates a flat section mimicking the lips.
You are trying to define the line of the top lip without carving into the clay.
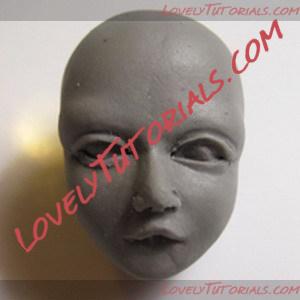 STEP 24:
 This is what you should be left with. This part of learning how to sculpt a face requires a lot of patience and practice. No beginner sculptor gets this step right first time around so don't feel bad if it takes you a couple tries. Just smooth it off with your finger and try again. The trick is to barely touch it. Wipe the clay with the side of the tip, not the point, and touch it very lightly. Use the tool like you're painting a feather.
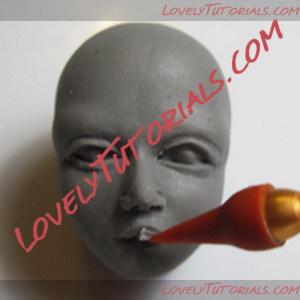 STEP 25:
 Now you add the Vermilion (the "cupid's bow"). This is the small spongey bit in the middle of the top lip. If you want to give her small lips, you need to make this bit very small or don't add it at all. If you what her to have large lips- you add more. For this doll I have given her fairly large lips. Note that I have only picked out a tiny ball of clay to add. Using the rubber-tipped tool, you can place the ball accurately in the middle of the top lip.
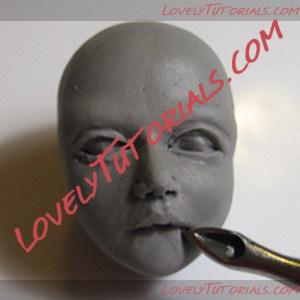 STEP 26:
 Using the rubber-tipped tool, carefully blend the clay you have just added into the lips. Use the spoon tool to smooth it out. Be careful not to ruin the detail work you have made. Make way for the bottom lip. Create small hollows just under each corner of the mouth. Look at your reference and notice that the bottom lip slightly tucks under the top lip. Creating these hollows allows you to emulate that effect.
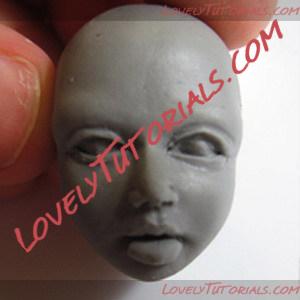 STEP 27:
 Roll a small ball of clay, slightly larger than you want the bottom lip to appear. You need to allow for a slight loss in size when you blend it in. Tuck it carefully under the top lip. Do not push it too hard against the top lip or the clay will distort. You want the mouth to look relaxed.
A very slightly opened mouth can give a nice natural effect.
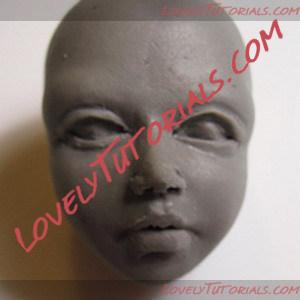 STEP 28:
 Now you can blend in the bottom lip. Use your spoon shaped tool and carefully work around the edges, being sure not to squish the whole bottom lip. You want it to retain it's shape; you're simply reducing the "seam line". Blend the left and right sides of the bottom of the lip down towards the jaw-line. You don't want a hard line right around the bottom lip or it will look pasted on, so blending the lip in these areas help to incorporate it into the face. Define the bottom lip harder just above where the chin would be.
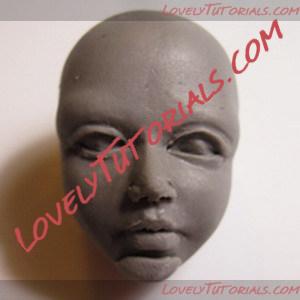 STEP 29:
 Now we need to make the chin line up better with the lips. At the moment it looks like she's missing a chin, so we'll build it back up. Knead a small ball of clay until it's soft and place in the chin area. Keep in mind that the female chin doesn't protrude as much as a male chin. Be sure that it doesn't jut out further than the bottom lip.
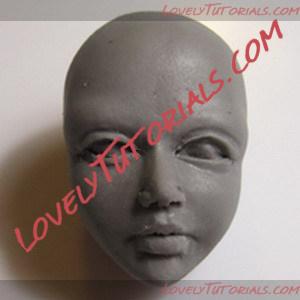 STEP 30:
 Because you kneaded the clay first and made it warm before adding it to the face, it should be easy to blend. Blend the polymer clay off with your spoon shaped sculpting tool.
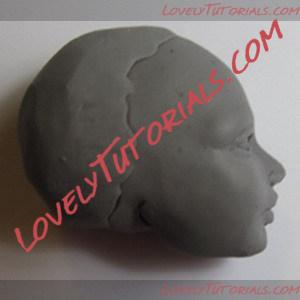 STEP 31:
 Now you get to make adjustments where needed. This is where you really need to hone in and touch up any anatomy problems. Study the face in head. Turning the face to the side I can see that the back of her head and her skull are not large enough. If you study the shape of the human skull you can see that both areas protrude out a lot more. Here I have simply added more clay to the back of the head. The jawbone should end halfway to the back of the skull.
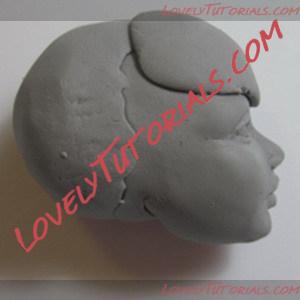 STEP 32:
 Now I've added some more clay to the forehead. Note that I've added more to the top of the head than the front. Women don't have a very pronounced brow, so you want to make sure you don't add too much clay to this area. Make sure all this clay is soft and warm by kneading before you add it to the doll. If it's too hard and cold it will require too much pressure to blend it- and you may distort the face.
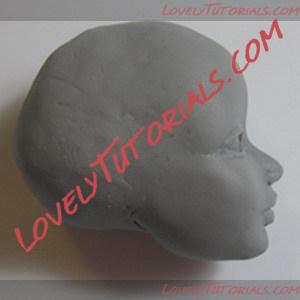 STEP 33:
 Blend everything in and check over the doll's face. Anything you can see that you don't like? Looking at the profile of the face I can see that I still don't like the way her brow is looking. I'm happy with the general shape of the head now though.
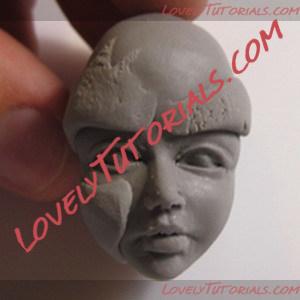 STEP 34:
 I've added thin layers of clay over top of the areas I wish to build out. Here I am adding a bit to her brow line and her right cheek. Don't be scared to go over and change things you don't like. Try to keep your patience and work at it until you're happy. You will progress in your skills in leaps and bounds if you do this step. If you keep doing the same mistakes without fixing it up, your skills will stagnate. Try to get it as accurate as your skills will allow. Push the bar.
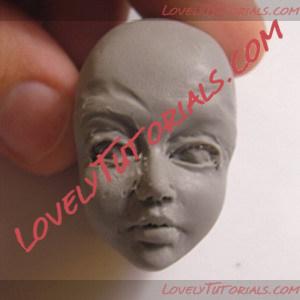 STEP 35:
 I'm going in and blending everything I've added and defining the bone ridges and details again. She is starting to look how I envisioned her. I'm still not happy with the eyes though. I need to fill the eyes out to give me a smoother plane to paint the eyeballs onto. I keep fiddling away....
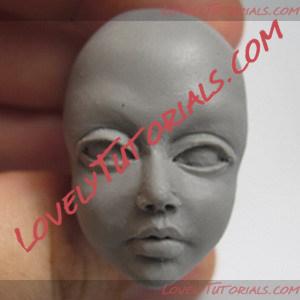 STEP 36:
 I'm happier with her appearance now. She's smoothed out, her eyes are how I wanted them and her brow looks like what I was trying to achieve. I hit the max of what my abilities would allow that day- I tried my best- and I find her visually pleasing.
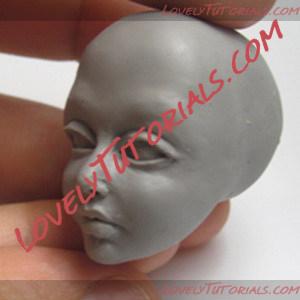 STEP 37:
 Double check your dolls head from every angle to ensure she looks right. Too often people get their dolls to look perfect from one angle, just to find another angle looks completely wrong. Check the jawline placement, as now we'll be sculpting the ears.
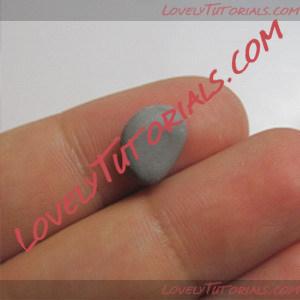 STEP 38:
 Roll out a small pancake of clay, making sure it's nice and soft so it's easier to blend in the next step. Note that the 'panacke' is slightly tear-drop in shape. The larger side will be the top of the ear, whilst the smaller side will form the earlobe.
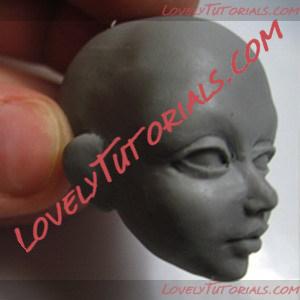 STEP 39:
 Carefully blend the ear into the side of the face. When trying to place the ears, think of these basic rules: 1. The part where the top of the ear connects to the head should be at the same level as the eyes.
2. The earlobe should finish just above the jawline.
3. The ear is placed halfway back on the head, at the same distance as the jawline.
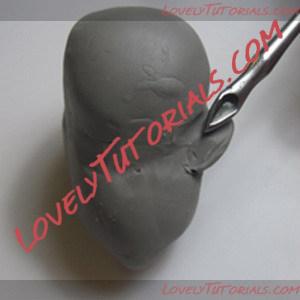 STEP 40:
 When you feel that you have the ear placement correct, blend the back of the ear into the head. Make sure the ears don't stick straight out of the head, nor should they be flat to the head. There should be a subtle angle outwards from the head. Make sure you leave a fair amount of bulk behind the ear. This will help strengthen the ear against snapping off after baking, and will allow room to sculpt the inner ear of the doll.
I think we're ready to move on.,
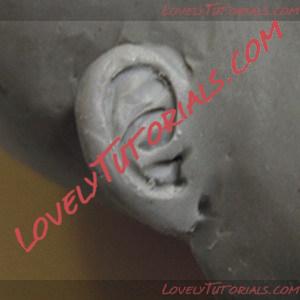 STEP 41:
 This is where you can go as realistic or as fantasy as you like. With this example I'm going to go somewhere between the two of them.
Using a photo reference, map out the basic shape and lines of the ear.
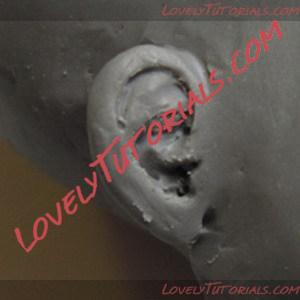 STEP 42:
 Start to carve into the clay with the rubber-tipped tool.
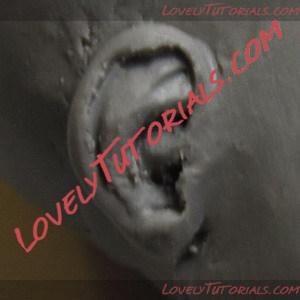 STEP 43:
 Keep following the lines you made on the ear and smooth it in.
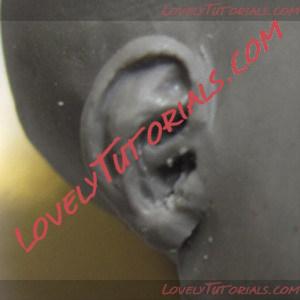 STEP 44:
 Finally , work around the ear defining all the shapes until you are happy with the sculptures appearance. If you're aiming for realism, remember to check over everything with your photo reference.
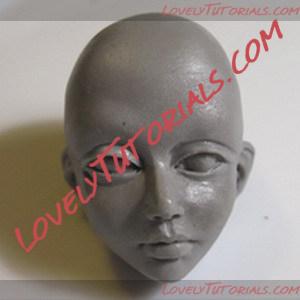 STEP 45:
 When you have sculpted both ears and are happy with your doll, smooth the polymer clay with some Prosculpt Smoothing Oil, Baby Oil or Petroleum Jelly. Remember, only ever use the TINIEST amount if you are using anything to smooth the clay. Too much oil added to the polymer clay can be detrimental to the quality of the bake and how well the paint adheres to the clay.
There you have it! After the doll's face has been baked to the clay manufacturers instructions, you can paint and decorate the doll as far as your imagination takes you.

