|
|
–ö–Μ–Β–Φ–Α―²–Η―¹, –Μ–Ψ–Φ–Ψ–Ϋ–Ψ―¹, Waldreben, Clematis,klematis, clematide, clematite, clemΟΓtide
|

27.07.2011, 19:13
|
|
–ê–¥–Φ–Η–Ϋ–Η―¹―²―Ä–Α―²–Ψ―Ä
|
|
–†–Β–≥–Η―¹―²―Ä–Α―Ü–Η―è: 07.09.2010
–Γ–Ψ–Ψ–±―â–Β–Ϋ–Η–Ι: 7,940
|
|
 –ö–Μ–Β–Φ–Α―²–Η―¹, –Μ–Ψ–Φ–Ψ–Ϋ–Ψ―¹, Waldreben, Clematis,klematis, clematide, clematite, clemΟΓtide
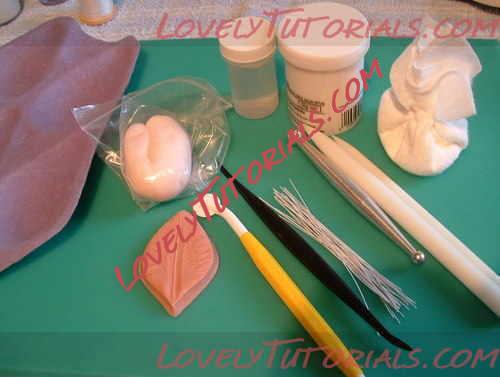
Clematis Flower What you will need:
Rolling board
Shaping tools, ball or bone, dresden tool(if using a cutter)
Slim rolling pins
Cutting wheel
Wires 28g
Orchard pad or similar
White fat(trex) or Petal base
cornflour bag
Petal paste (colour of your choice)
Sugar glue or egg white
Former of choice (in this instance a cardboard pear tray)
Dusky Rose wide Clematis veiner (click here) or suitable cutter if you have one
 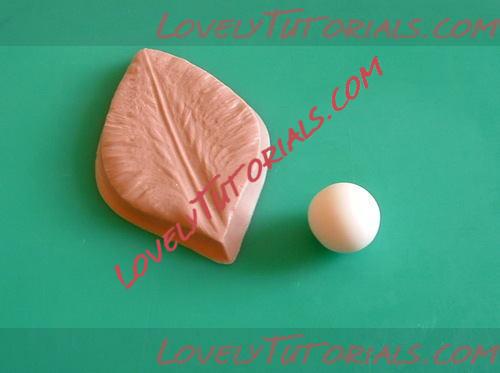 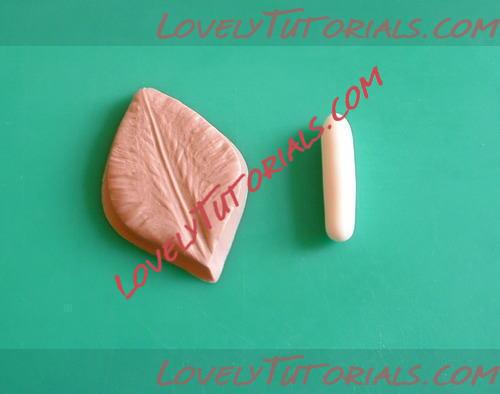 Take a piece of well worked paste and roll into a ball. From the ball roll into a sausage shape.
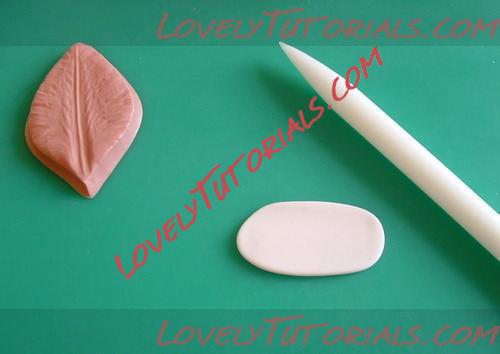 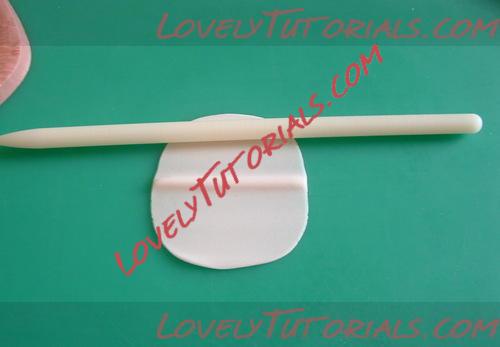 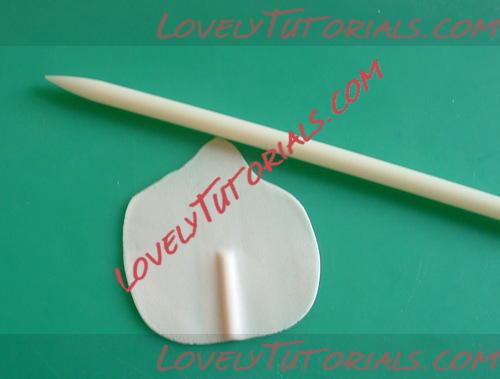 Smear a very little white fat on your rolling board and using a small rolling pin, roll out the paste to a thickness of 2-3mm. From the centre of the paste start rolling away from you, and then from the other side of the paste roll towards you. The idea is to leave a thicker area of paste in the centre in which to insert your wire. Turn the paste around and roll away the top part of the ridge as shown, until you have a uniform thickness all around.
If you are using cutters, you should cut out your petal shape now, and vein the centre and sides of the petal with the dresden tool.
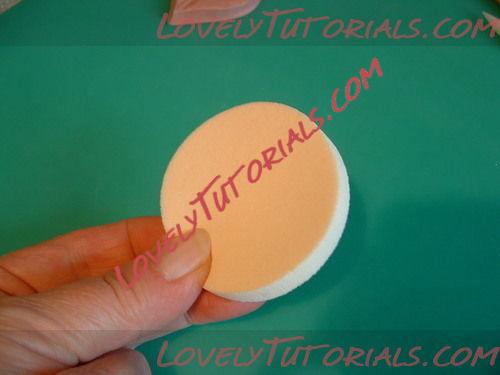
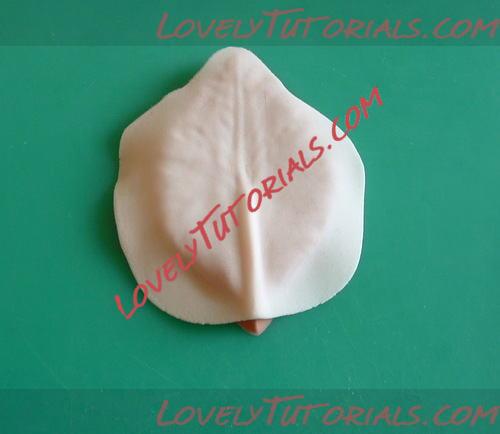 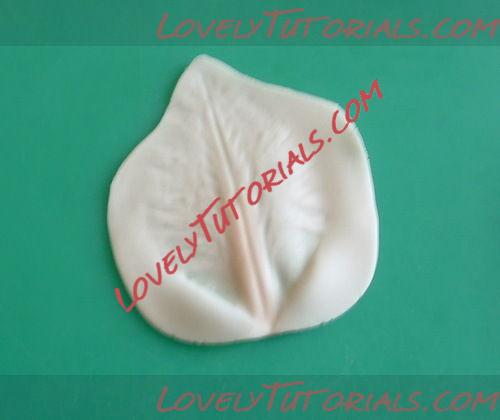 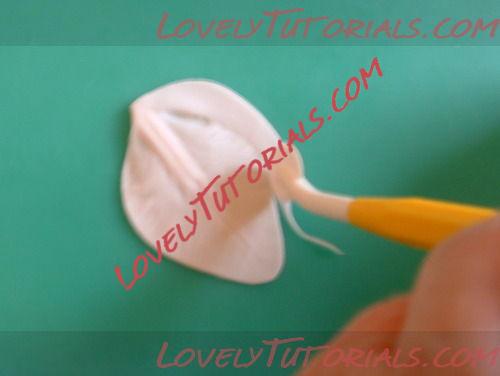 If using the Dusky Rose veiner, lift up the paste and place over the veiner, positioning the centre ridge in the paste in line with the centre of the veiner. Press the paste into the veiner with the flat of your extended fingers. If you have hot hands or the paste is sticky, use a make up sponge like the one shown dusted with a little cornflour to press the paste to the veiner, but make sure you do not lose the centre ridge. Lift the paste off the veiner and turn over.
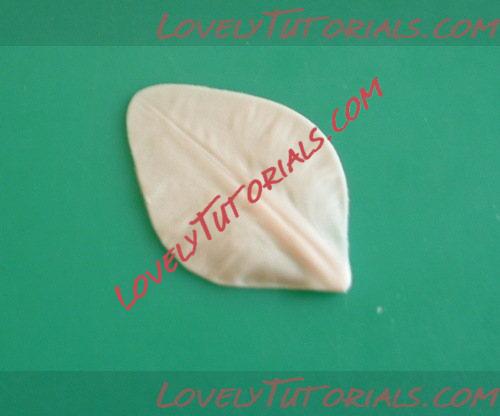  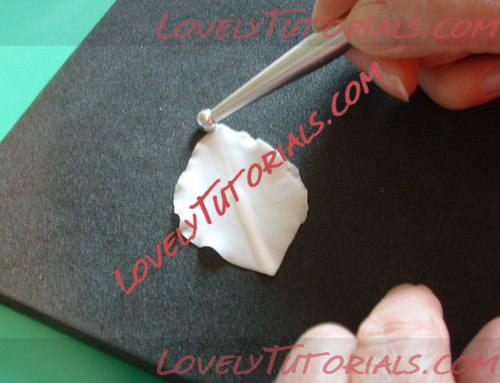
Using your cutting wheel, cut out the impression left in the paste and transfer the cut piece to your softening pad. Take the ball or bone tool and gently frill the very edges of the petal. The tool should be half on and half off the petal.
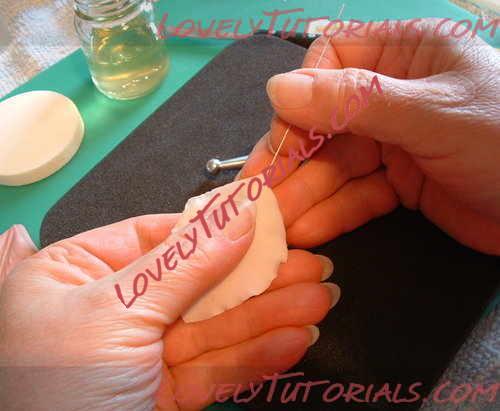 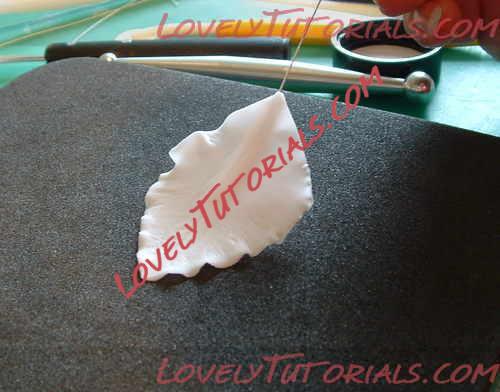  Take a 1/4 length piece of 28g wire and moisten the end of the wire with your chosen glue. Hold the petal very gently between your fingers and thumb and thread the wire into the length of the ridge at the back of the petal. Even if you can't see how far the wire is being inserted, with practice you will be able to "feel" how far the wire is being inserted.
Clematis flowers like these have anything from 5 to 9 petals, so make the required number of petals for your flower in the same way and place into your chosen former to dry. Look at images of real flowers to see how you want the petals to sit with each other. Some clematis have gentle curves , some have very erect petals.
~~~~~~
Alternative wiring
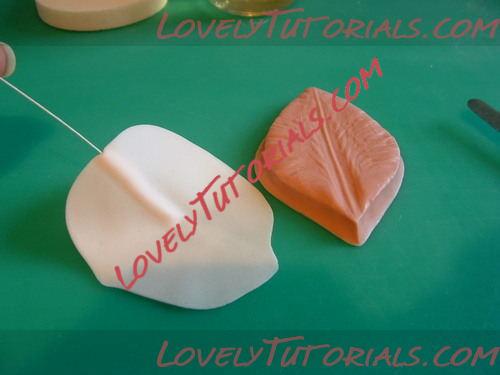 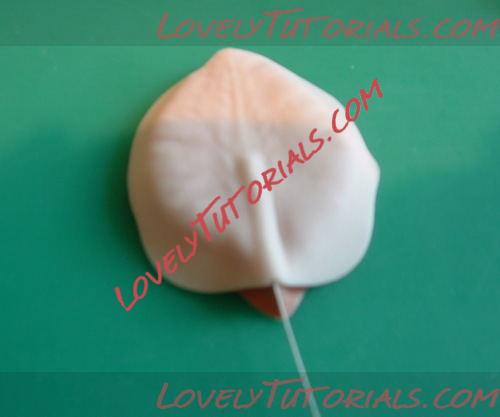 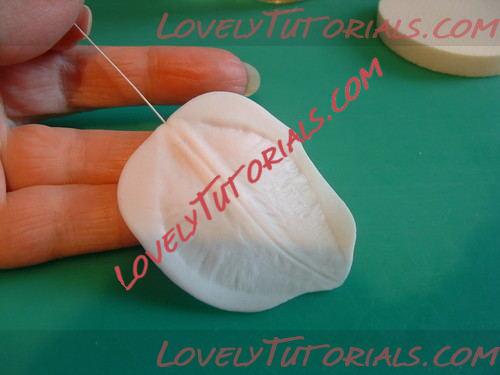 If you have problems inserting the wires into your finished petals or you are unable to achieve a neat ridge, you can insert your wires into your rolled out paste before being placed on the veiner, as shown.
~~~~~~ Finishing your flower
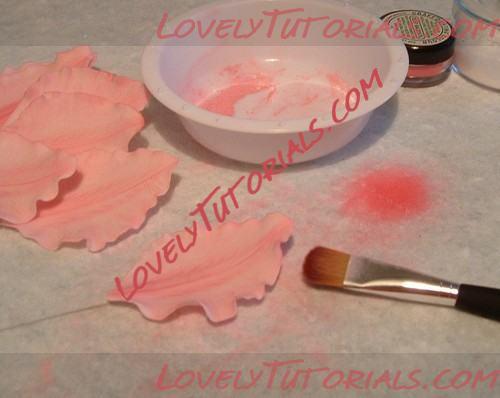   Once all your petals have dried, you can dust them in shades of your choice. I always choose to mix colours in a paint palette or separate pot, finding colours straight out of the pot they come in too concentrated for a delicate effect. Here I have mixed a pink petal dust with cornflour and have just increased the depth of colour in the centre of the petals. Colour can always be added but is difficult to remove once there.
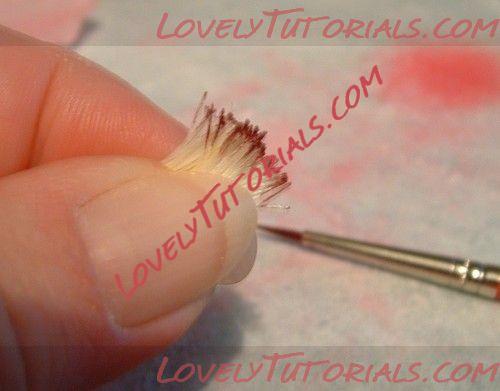
Here I have mixed a little burgundy dusting colour with a little alcohol and painted on the edges of the cottons, and randomly streaked the centre and some of the cottons. Also added a little lemon petal dust to the centre.
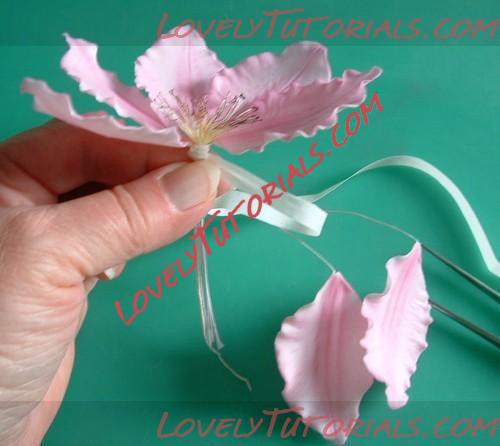 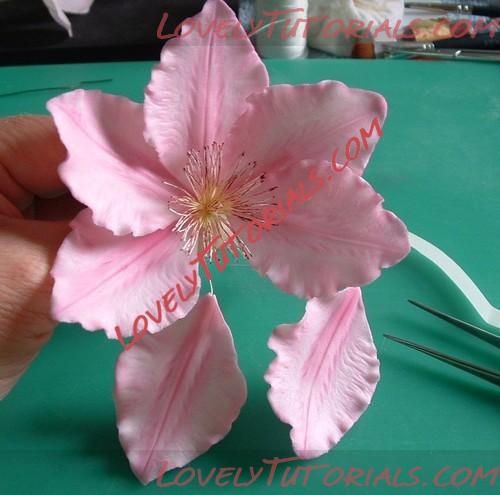 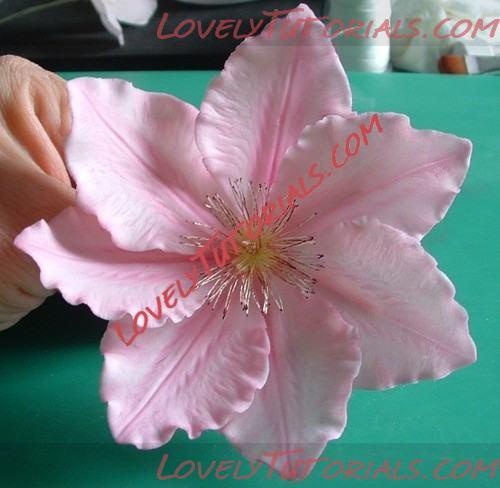 Take a pair of tweezers and bend the wires at right angles on all your petals before you start taping up. Do not be tempted to bend them by hand, as the petals could break. Tape the petals together one by one, overlapping slightly as you go in a uniform pattern around the stamen centre. Try to keep the tape as tight as you can so that the petals are not flapping around. Once all the petals are taped into place you can use an extra length of heavier guage wire taped down the stem to give added strength to the flower. Steam to set the dusting colours.
The finished flower, and also a smaller Clematis Montana flower showing a smaller stamen middle 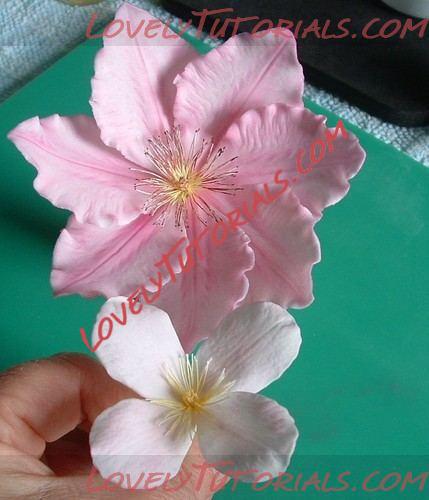
|

25.11.2012, 18:53
|
|
–ê–¥–Φ–Η–Ϋ–Η―¹―²―Ä–Α―²–Ψ―Ä
|
|
–†–Β–≥–Η―¹―²―Ä–Α―Ü–Η―è: 07.09.2010
–Γ–Ψ–Ψ–±―â–Β–Ϋ–Η–Ι: 7,940
|
|
|

10.03.2013, 19:49
|
|
–ê–¥–Φ–Η–Ϋ–Η―¹―²―Ä–Α―²–Ψ―Ä
|
|
–†–Β–≥–Η―¹―²―Ä–Α―Ü–Η―è: 05.03.2013
–Γ–Ψ–Ψ–±―â–Β–Ϋ–Η–Ι: 698
|
|
|

10.03.2013, 21:04
|
|
–ê–¥–Φ–Η–Ϋ–Η―¹―²―Ä–Α―²–Ψ―Ä
|
|
–†–Β–≥–Η―¹―²―Ä–Α―Ü–Η―è: 05.03.2013
–Γ–Ψ–Ψ–±―â–Β–Ϋ–Η–Ι: 698
|
|
|

14.05.2013, 13:09
|
|
–ê–¥–Φ–Η–Ϋ–Η―¹―²―Ä–Α―²–Ψ―Ä
|
|
–†–Β–≥–Η―¹―²―Ä–Α―Ü–Η―è: 05.03.2013
–Γ–Ψ–Ψ–±―â–Β–Ϋ–Η–Ι: 698
|
|
|

07.05.2019, 07:55
|
|
–ê–¥–Φ–Η–Ϋ–Η―¹―²―Ä–Α―²–Ψ―Ä
|
|
–†–Β–≥–Η―¹―²―Ä–Α―Ü–Η―è: 10.03.2016
–Γ–Ψ–Ψ–±―â–Β–Ϋ–Η–Ι: 1,030
|
|
|
 |
|
–€–Β―²–Κ–Η
|
addΡ±m-akasma gΟΦl addΡ±m, adΡ±m yabanasmasΡ± ΟßiΟßek adΡ±m, akasma, anlegget, anlΟΛggning, armado de los ramos, arranjo, artesanatos passo a passo, augalas, baking, biljka, bitki, blad, blade, blader, bladeren, blatt, bloem, bloemen, blomma, blommor, blomst, blomster, blume, blumen, blΟΦten, blΟΦtenpaste, blΟΛtter, boeket, bouquet, buchet, buket, bukett, bukiet, bunga clematis langkah demi langkah, buquΟΣ, cake decorating, cake decorating techniques, cerΟΔmica plΟΓstica, chiodi di garofano, clavo de olor, clematide, clematis, clematis blodau gam wrth gam, clematis blom stap vir stap, clematis blomma steg fΟΕr steg, clematis blomst trin for trin, clematis blume schritt fΟΦr schritt, clematis blΟ≥m skref fyrir skref, clematis bunga langkah demi langkah, clematis fiore passo dopo passo, clematis flor pas a pas, clematis flor paso a paso, clematis floro pa≈ùo post pa≈ùo, clematis flos gradatim, clematis flower, clematis flower step by step, clematis flower αÉîαÉΔαÉêαÉûαÉùαÉëαɆαÉ?αÉïαÉêαÉ™, clematis flΟ® etap pa etap, clematis kukka askel askeleelta, clematis lore urratsez urrats, clematis pas cu pas flori, clematis paso a paso flor, clematis pass fjura pass, clematis passo a passo flor, clematis tutorial, clematis ua hatua kwa hatua, clematis ziedu soli pa solim, clematis ύΗ²ύΗ±ύΙâύΗôύΗïύΗ≠ύΗô clematis ύΗîύΗ≠ύΗ¹ύΙ³ύΗΓύΙâύΗïύΗ≤ύΗΓύΗ²ύΗ±ύΙâύΗôύΗïύΗ≠ύΗô, clematis ―Ü–≤–Β―² ―΅–Β–Κ–Ψ―Ä –Ω–Ψ ―΅–Β–Κ–Ψ―Ä, clematissenbloem stap voor stap, clematisΊ¨ clematis ΌΨΎΨΌàΌ³ Ό²Ί·ΌÖ Ό²Ί·ΌÖ Ύ©έ¨ ΊΖΊ±Ό¹ Ί≥έ£, clematite, clous de girofle, cloves, clΟ©matite, clΟ©matite fleur, cold porcelain, cold porcelain figurines, cold porcelain flowers, confeitando bolos, csokor, cukrini≈≥ gΡ½li≈≥, curso completo de flores, curso de modelado, cvijet, cvijeΡ΅e, cΟΔy Ο¥ng lao, cΟΔy Ο¥ng lao hoa tαΜΪng bΤΑαΜ¦c, decoracion de pasteles, decoraciΟ≥n de tortas, decorare le torte, decorazioni, deko fondant, dekorace na dort, dekoracija, dekoracije, dekorasyon, dekorΟΓcie, el abc del armado de ramos, elulΟΒngad, elulΟΒngad lill samm-sammult, feuille, feuilles, fimo, fimo flowers, fiore, fiori, fleurs, floare, flogistica, flor, floral inspirations, flores, flores azucar, flores e folhas, flori, floristics, floristik, floristikk, floristique, florΟ≠stica, flower, flower paste, flowering plants, flowers, flowers on a wire, foglia, foglie, folha, folhas, folhas pintadas, fondan, fondant, fondente, fotopostup, frunze, gabhrΟΓn, gabhrΟΓn blΟΓth cΟ©im ar chΟ©im, gum pasta, gum paste, gum paste flowers, gumpaste, gumpaste flowers class, gΡ½lΡ½, gΡ½lΡ½s, hand painting, handmade, handmodelliert, hideg porcelΟΓn, hladno porculan, hoja, hojas, how to, how t―Ü–≤–Β―²―΄ –Ϋ–Α –Ω―Ä–Ψ–≤–Ψ–Μ–Ψ–Κ–Β, impianto, iszalag, iszalag virΟΓg, kaldt porselen, kallt porslin, kalt porzellan, kasvi, klematis, klematis blomst trinnvis, klematis bulaklak hakbang sa pamamagitan ng hakbang, kolde porcelΟΠn, korak po korak, koud porselein, kukka, kukkakimppu, kukkia, kulpΟΪr, kulpΟΪr hap pas hapi lule, kvetina, kvety, kvΡ¦tina, kvΡ¦tiny, kwiat, kwiaty, kylmΟΛ posliini, kytica, lapai, lapas, leaf, leaves, lehdet, lehti, levelek, levΟ©l, list, listΟ≠, li≈ΓΡ΅e, li≈¦cie, li≈¦Ρ΅, lΟ©pΟ©sr≈ël lΟ©pΟ©sre, lΟ≠stia, lΟ≠stky na drΟΓtku, making sugar flowers, mazzo, modellierpaste, modell…ô≈üdirm…ô, modelovanie, modelovΟΓnΟ≠, modelowanie, montando, motivtorten, nelken, nΟΓvody a postupy, nΟΓvody na kvΡ¦ty a lΟ≠stky, nΟΕvΟ©ny, oasis o esponja de floristeria, pap, paso a paso, passo a passo, passo-a-passo, pasta flexible, pavit, pavit cvijet, pflanze, plamienok, plamienok kvet krok za krokom, plamΟ©nek, plamΟ©nek kvΡ¦t krok za krokem, plant, planta, plante, plantes, plantΡÉ, pocelana fria, polymer clay, polymer clay flowers tutorial, porcelaine froide, porcelana fria, porcelana frΟ≠a, porcellana fredda, postup klinΡçek, postupak za ukrasavanje, powojnik, powojnik kwiat krok po kroku, puok≈ΓtΡ½, raganΡ½, raganΡ½ gΡ½li≈≥ ≈Ψingsnis po ≈Ψingsnio, ramo, rastlina, rece por≈Θelan, rododendron, rostlina, ro≈¦lina, schritt fΟΦr schritt anleitung, schritt-fΟΦr-schritt, sculpey flowers, sculpting, simple, soΡüuk porselen, srobot, srobot cvet korak za korakom, stamens, steg for steg, step by step, step-by-step, strauΟü, studenΟΫ porcelΟΓn, styrofoam, sugar cane flowers, sugar cloves, sugar flower, sugar flowers, sugar flowers for cake decorating, sugar paste flowers, sugarcraft, sugarpaste, sukker art, technique utilisΟ©e fleurs en sucre cru, tecnicas de decoracion, tecniche, thai flowers, torte, torte decorate, torten dekorieren, torti, trin for trin, trin-for-trin, trinn for trinn, tutorial, tutorijal, ukra≈Γavanje torti, uputstvo za dekoraciju, virΟΓg, virΟΓgok, waldreben, wedding cake, wedding cakes, wire, yabanasmasΡ±, yaprak, yapraklar, zimno porcelany, zuckerblumen, ύΗîύΗ≠ύΗ¹ύΙ³ύΗΓύΙâ, ύΚ²ύΚ±ύΜâύΚôύΚïύΚ≠ύΚô clematis ύΚîύΚ≠ύΚ¹ by ύΚ²ύΚ±ύΜâύΚôύΚïύΚ≠ύΚô, ύΣΒύΪ΅ύΣ≤ύΪ΄, ύΣΒύΪ΅ύΣ≤ύΪ΄ ύΣΣύΣ½ύΣ≤ύΪ¹ύΣ² ύΣΠύΪçύΣΒύΣΨύΣΑύΣΨ ύΣΪύΪ²ύΣ≤ ύΣΣύΣ½ύΣ≤ύΪ¹ύΣ², ύ≤ïύ≥çύ≤≤ύ≥Üύ≤°ύ≥çύ≤·ύ≤Ψύ≤üύ≤Ωύ≤Ηύ≥ç, ύ≤Ιύ≤²ύ≤Λ ύ≤ïύ≥çύ≤≤ύ≥Üύ≤°ύ≥çύ≤·ύ≤Ψύ≤üύ≤Ωύ≤Ηύ≥ç ύ≤Ιύ≥²ύ≤Βύ≤Ωύ≤® ύ≤Ιύ≤²ύ≤Λύ≤Π, ύΛΗύΛ€ύΛΨ ύΛïύΞ΅ύΛï, ύΛïύΞçύΛ≤ύΞ΅ύΛ°ύΛΨύΛüύΛΩύΛΗ, ύΛïύΞçύΛ≤ύΞ΅ύΛ°ύΛΨύΛüύΛΩύΛΗ ύΛïύΛΠύΛ° ύΛΗύΞ΅ ύΛïύΛΠύΛ° ύΛΪύΞ²ύΛ≤, ύΛ°ύΞâύΛΓύΛ≤ύΛΩύΛ²ύΛ½, ύΠ§ύΠ®ύΠ≤ύΠΛύΠΨύΠ§ύΠΩύΠΕύß΅ύΠΖ, ύΠ§ύΠ®ύΠ≤ύΠΛύΠΨύΠ§ύΠΩύΠΕύß΅ύΠΖ ύΠßύΠΨύΠΣύß΅ ύΠßύΠΨύΠΣύß΅ ύΠΪύß¹ύΠ≤, ύ°ïύ·çύ°≥ύ°Ωύ°°ύ·΅ύ°üύ°Ωύ°Ηύ·ç, ύΑÖύΑΓύ±¹ύΑ½ύ±¹ ύΑΠύ±çύΑΒύΑΨύΑΑύΑΨ ύΑïύ±çύΑ≤ύ±ÜύΑ°ύΑüύΑΩύΑΗύ±ç ύΑΪύ±çύΑ≤ύΑΒύΑΑύ±ç ύΑΠύΑΕύΑ≤, ύΑïύ±çύΑ≤ύ±ÜύΑ°ύΑüύΑΩύΑΗύ±ç, ψÉΔψÉ΅ψÉΪ, ψ²·ψɧψÉûψɹψ²ΙψĹψ²·ψɧψÉûψɹψ²Ιψ¹°ηä±ψ²ΙψÉÜψÉÉψÉ ½ψÉêψ²Λψ²ΙψÉÜψÉÉψɽ, ΟßiΟßek, ΟßiΟßek modelleme, Ο©tape par Ο©tape, ≈Γalto porceliano, εΜΚφ®Γ, ηΘùιΘΨ禴γ≥ï, ηä±ιêΒγΖöη™°οΦ¨ε®¹ιùàδΜôδΗÄφ≠ΞδΗÄφ≠Ξ, ηä±ι™¹γΚΩηé≤οΦ¨ε®¹γ¹ΒδΜôδΗÄφ≠ΞδΗÄφ≠Ξ, λß³κ΄§κû?, μ¹¥κ†à κßàμ΄ΑλäΛ κ΄®ξ≥³κΓ€ μ¹¥κ†à κßàμ΄ΑλäΛ ξΫÉ κ΄®ξ≥³, ΈΚΈΜΈΖΈΦΈ±œ³ΈΙœ³Έ°œ² ΈΜΈΩœÖΈΜΈΩœçΈ¥ΈΙ Έ≤Έ°ΈΦΈ± œÄœ¹ΈΩœ² Έ≤Έ°ΈΦΈ±, ΈΚœ¹œçΈ± œÄΈΩœ¹œÉΈΒΈΜΈ§ΈΫΈΖ, ΈΦœÄΈΩœÖΈΚΈ≠œ³ΈΩ, Έ±ΈΕΈ±ΈΜΈ≠Έ±, ΈΜΈΩœÖΈΜΈΩœçΈ¥ΈΙ, ΈΜΈΩœÖΈΜΈΩœçΈ¥ΈΙΈ±, œ³Έ± œÜœçΈΜΈΜΈ±, œÜœçΈΜΈΜΈ±, œÜœÖœ³œ¨, –Κ–≤–Β―²–Κ–Α, –Κ–≤–Β―²–Κ―•, –Κ–≤―•―²–Η, –Κ–≤―•―²–Κ–Α, –Κ–Α–Κ ―¹–Μ–Β–Ω–Η―²―¨ –Κ–Μ–Β–Φ–Α―²–Η―¹, –Κ–Β―Ä–Α–Φ–Η―΅–Β―¹–Κ–Α―è ―³–Μ–Ψ―Ä–Η―¹―²–Η–Κ–Α, –Κ–Μ–Β–Φ–Α―²–Η―¹, –Κ–Μ–Β–Φ–Α―²–Η―¹ ―Ü–≤–Β―²–Β ―¹―²―ä–Ω–Κ–Α –Ω–Ψ ―¹―²―ä–Ω–Κ–Α, –Κ–Μ–Β–Φ–Α―Ü―•―¹―΄, –Κ―É―¹―², –≥–≤–Ψ–Ζ–¥–Η–Κ–Α, –Ω–Ψ–Μ–Η–Φ–Β―Ä–Ϋ–Α―è –≥–Μ–Η–Ϋ–Α, –Ω–Ψ–Μ–Β–≤―΄–Β ―Ü–≤–Β―²―΄, –Ω–Ψ―à–Α–≥–Ψ–≤–Ψ, –Ω―Ä–Η―Ä–Ψ–¥–Α, –Φ–Κ, –Φ–Ψ–¥–Β–Μ–Η―Ä–Α–Ϋ–Β, –Φ–Α–Ι―¹―²–Β―Ä-–Κ–Μ–Α―¹–Η, –Φ–Α―Ä―à–Φ–Β–Μ–Μ–Ψ―É, –Φ–Α―¹―²–Η–Κ–Α, –Φ–Α―¹―²–Β―Ä-–Κ–Μ–Α―¹―¹, –Φ–Α―¹―²–Β―Ä-–Κ–Μ–Α―¹―¹ –Ω–Ψ –Μ–Β–Ω–Κ–Β, –Α–Ζ–Α–Μ–Η―è, –Α–Ζ–Α–Μ―•―è, –±―É–Κ–Β―², –Ζ–Α–≤–Ψ–¥, –Μ–Η―¹―²–Α, –Μ–Η―¹―²―¨―è, –Μ–Η―¹―²―è, –Μ–Ψ–Φ–Ψ–Ϋ–Ψ―¹, –Μ–Ψ–Φ–Ψ–Ϋ–Ψ―¹ –Κ–≤―•―²–Η –Κ―Ä–Ψ–Κ –Ζ–Α –Κ―Ä–Ψ–Κ–Ψ–Φ, –Μ–Ψ–Φ–Ψ–Ϋ–Ψ―¹ ―Ü–≤–Β―²―΄ ―à–Α–≥ –Ζ–Α ―à–Α–≥–Ψ–Φ, –Μ–Α–Φ–Α–Ϋ–Ψ―¹–Α―û –Κ–≤–Β―²–Κ―• –Κ―Ä–Ψ–Κ –Ζ–Α –Κ―Ä–Ψ–Κ–Α–Φ, –Μ–Β–Ω–Η–Φ ―Ü–≤–Β―²―΄, –Μ–Β–Ω–Κ–Α, –Μ–Β–Ω–Κ–Α –Η–Ζ –≥–Μ–Η–Ϋ―΄, –Μ–Β–Ω–Κ–Α –Η–Ζ –Ω–Μ–Α―¹―²–Η–Κ–Η, –Μ–Β–Ω–Κ–Α ―Ü–≤–Β―²–Ψ–≤, –Μ―•–Ω–Μ–Β–Ϋ–Ϋ―è, –Μ―•―¹―Ü–Β, ―Ä–Ψ―¹–Μ–Η–Ϋ–Α, ―Ä–Α―¹―²–Β–Ϋ–Η–Β, ―Ä–Α―¹―²–Β–Ϋ–Η―è, ―É–Κ―Ä–Α―à–Β–Ϋ–Η–Β ―²–Ψ―Ä―²–Ψ–≤, ―É–Κ―Ä–Α―à–Β–Ϋ–Η–Β ―²–Ψ―Ä―²–Α, ―¹–≤–Α–¥–Β–±–Ϋ―΄–Ι ―²–Ψ―Ä―², ―¹–Α―Ö–Α―Ä–Ϋ–Α―è –Φ–Α―¹―²–Η–Κ–Α, ―¹–Α―Ö–Α―Ä–Ϋ―΄–Ι –Κ–Μ–Β–Ι, ―É―Ä–Ψ–Κ–Η –Ω―Ä–Η–Κ―Ä–Α―à–Α–Ϋ–Ϋ―è, ―¹―²―É–¥–Β–Ϋ –Ω–Ψ―Ä―Ü–Β–Μ–Α–Ϋ, ―²–Ψ―Ä―², ―³–Η–Φ–Ψ, ―³–Μ–Ψ―Ä–Η―¹―²–Η–Κ–Α, ―³–Μ–Ψ―Ä–Α, ―Ö–Ψ–Μ–Ψ–¥–Ϋ–Ψ–≥–Ψ –Ω–Ψ―Ä―Ü–Β–Μ―è–Ϋ–Η, ―Ö–Ψ–Μ–Ψ–¥–Ϋ–Ψ–≥–Ψ ―³–Α―Ä―³–Ψ―Ä–Α, ―Ö–Ψ–Μ–Ψ–¥–Ϋ―΄–Ι ―³–Α―Ä―³–Ψ―Ä, ―Ö–Α–Μ–Ψ–¥–Ϋ–Α–≥–Α ―³–Α―Ä―³–Ψ―Ä―É, ―Ü–≤–Β―²–Ψ–Κ, ―Ü–≤–Β―²–Ψ―΅–Ϋ–Α―è –Ω–Α―¹―²–Α, ―Ü–≤–Β―²–Β, ―Ü–≤–Β―²―è, ―Ü–≤–Β―²―΄, ―Ü–≤–Β―²―΄ –Η–Ζ –Ω–Ψ–Μ–Η–Φ–Β―Ä–Ϋ–Ψ–Ι –≥–Μ–Η–Ϋ―΄, ―Ü–≤–Β―²―΄ –Η–Ζ ―Ö–Ψ–Μ–Ψ–¥–Ϋ–Ψ–≥–Ψ ―³–Α―Ä―³–Ψ―Ä–Α, ―Ü–≤–Β―²―΄ –Ϋ–Α ―²–Ψ―Ä―², ―Ü–≤–Β―²―΄ ―Ä―É―΅–Ϋ–Ψ–Ι ―Ä–Α–±–Ψ―²―΄, ―Ü–Μ–Β–Φ–Α―²–Η―¹, ―Ü–Μ–Β–Φ–Α―²–Η―¹ ―Ü–≤–Β―² –Κ–Ψ―Ä–Α–Κ –Ω–Ψ –Κ–Ψ―Ä–Α–Κ, ―à–Α–≥ –Ζ–Α ―à–Α–≥–Ψ–Φ, Ή•Ή€Ή•Ή€, Ή•Ή€Ή•Ή€ ΉΠΉΔΉ™ ΉêΉ½Ή® ΉΠΉΔΉ™ ΉΛΉ®Ή½, ΉßΉ€ΉΔΉûΉê÷ΖΉ?ΉôΉΓ, ΉßΉ€ΉΔΉûΉê÷ΖΉ?ΉôΉΓ ΉëΉ€ΉïΉù Ή©Ή®ΉôΉ? Ή™ΉïΉ®Ήö Ή©Ή®ΉôΉ?  |
|

