|
|
Groom & Bride wedding cake topper tutorial | "Жених и невеста" фигурка на торт
|

26.08.2011, 19:25
|
|
Администратор
|
|
Регистрация: 07.09.2010
Сообщений: 7,669
|
|
 Groom & Bride wedding cake topper tutorial | "Жених и невеста" фигурка на торт
A huge shout out to to author for this great Master Class
Oгромная благодарность автору за МК
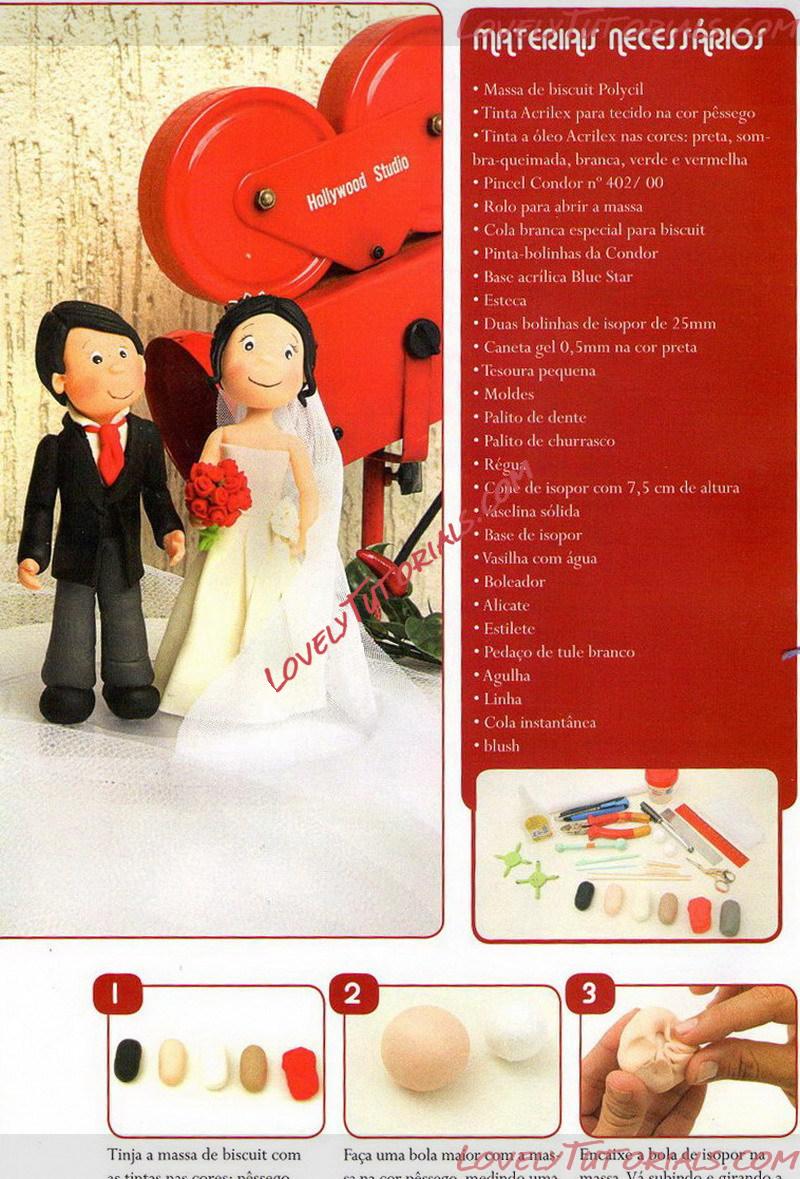
Necessary Materials
- Polycil biscuit dough
- Acrilcx paint for fabric in peach color
- Acrilcx oil paint in colors: black, burnt eyeshadow, white, green and red
- Condor brush n ° 402/00
- Roll to open the dough
- Special white glue for biscuit
- Condor polka dots
- Blue Star acrylic base
- Esteca
- Two 25mm Styrofoam balls
- Black 0.5mm gel pen
- Small scissors
- Molds
- Toothpick
- Barbecue stick
- Scale.
- Styrofoam cone 7.5 cm high
- Solid petroleum jelly
- Styrofoam base
- Bowl with water
- Boleador
- Pliers
- Stylus
- Piece of white tulle
- Needle
- Line
- Instant glue
- Blush
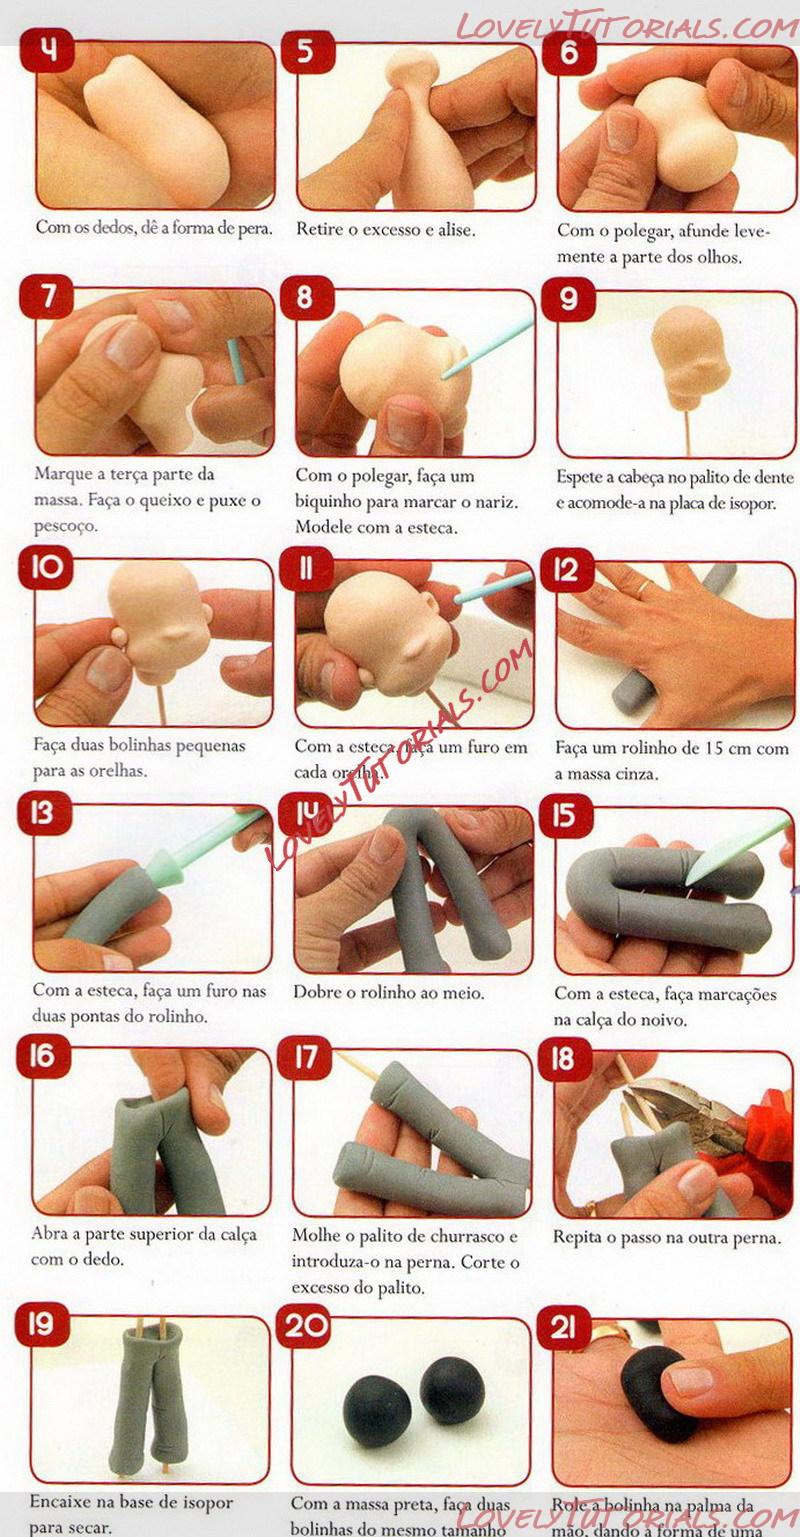 4. With your fingers, shape it into a pear.
5. Remove excess and smooth.
6. With your thumb, lightly sink the part of the eyes.
7. Mark the third part of the dough. Make the chin and pull the neck.
8. With your thumb, pout to mark your nose. Model with the esteca.
9. Stick the head on the toothpick and place it on the Styrofoam plate.
10. Make two small balls for the ears.
11. With the head, drill a hole in each ear.
12. Make a 15 cm roll with the gray dough.
13. With the dowel, drill a hole in the two ends of the roll.
14. Fold the roll in half.
15. With the stool, make markings on the groom's pants.
16. Open the top of the pants with your finger.
17. Wet the barbecue stick and insert it into the leg. Cut off the excess toothpick.
18. Repeat the step on the other leg.
19. Fit the styrofoam base to dry.
20. With the black dough, make two balls of the same size.
21. Roll the ball in the palm of your hand, forming the shape of one.
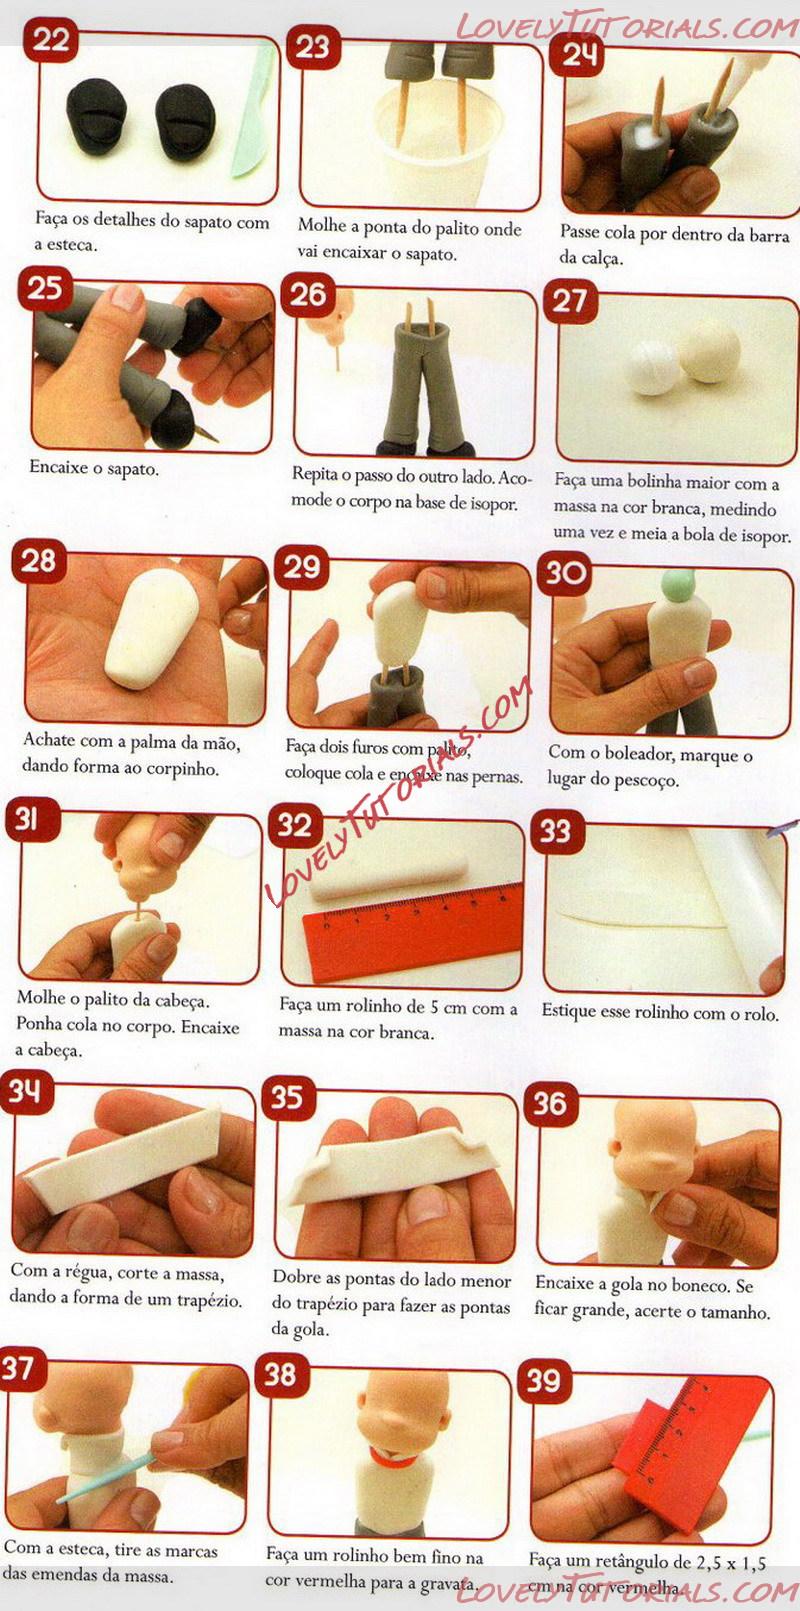 22. Make the details of the shoe with the stick.
23. Wet the tip of the toothpick where the shoe will fit.
24. Apply glue inside the hem of the pants.
25. Fit the shoe.
26. Repeat the step on the other side. Place the body on the styrofoam base.
27. Make a larger ball with the dough in white, measuring one and a half times the Styrofoam ball.
28. Flatten with the palm of your hand, giving shape to the body.
29. Drill two holes with toothpick, put glue and fit the legs.
30. With the boleador, mark the place of the neck.
31. Wet the toothpick in your head. Put glue on the body. Fit the head.
32. Make a 5 cm roll with white dough.
33. Extend this roll with the roller.
34. With the ruler, cut the dough into a trapezoid shape.
35. Fold the ends of the smaller side of the trapezoid to make the ends of the collar.
36. Fit the collar to the doll. If it gets big, make the size right.
37. With the stake, remove the marks from the seams.
38. Make a very thin red roll for the tie.
39. Make a 2.5 x 1.5 rectangle.
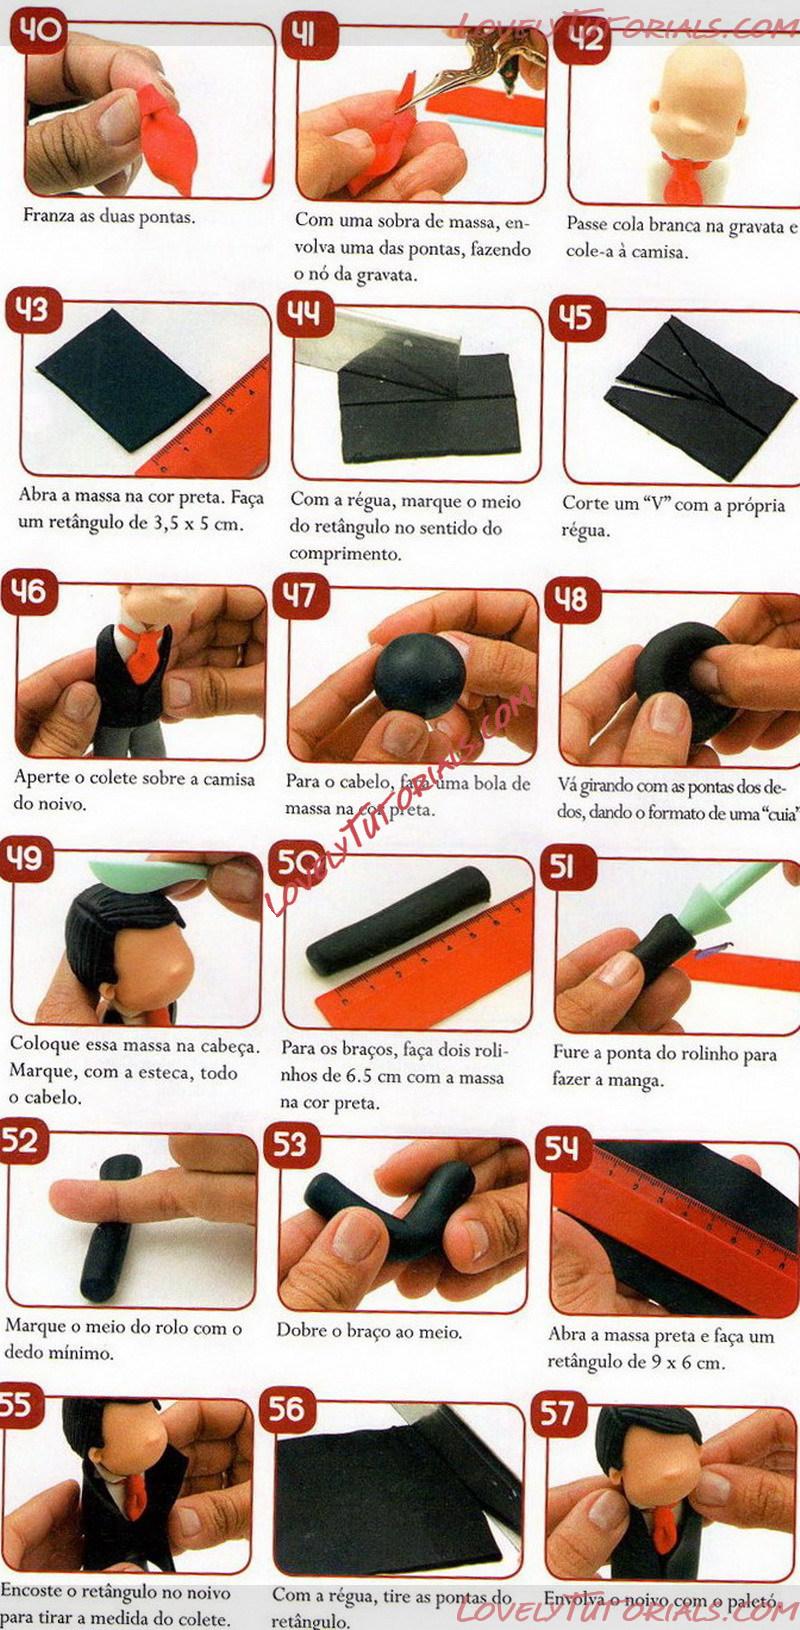 40. Frown both ends.
41. With a leftover dough, wrap one end, making the tie knot.
42. Apply white glue to the tie and glue it to the shirt.
43. Roll out the dough in black. Make a 3.5 x S cm rectangle.
44. Using the ruler, mark the middle of the rectangle lengthwise.
45. Cut a "V" with the ruler itself.
46. Fasten the vest over the groom's shirt.
47. For hair, make a ball of black colored dough.
48. Rotate with your fingertips, giving the shape of a "gourd".
49. Put this dough on your head. Mark the hair with the csteca.
50. For the arms, make two 6.5 cm rolls with the dough in black.
51. Pierce the end of the roll to make the sleeve.
52. Mark the middle of the roll with your little finger.
53. Fold the arm in half.
54. Open the black dough and make a 9 x 6 cm rectangle.
55. Place the rectangle against the bridegroom to measure the waistcoat.
56. Using the ruler, remove the ends of the rectangle.
57. Wrap the groom around with the suit.
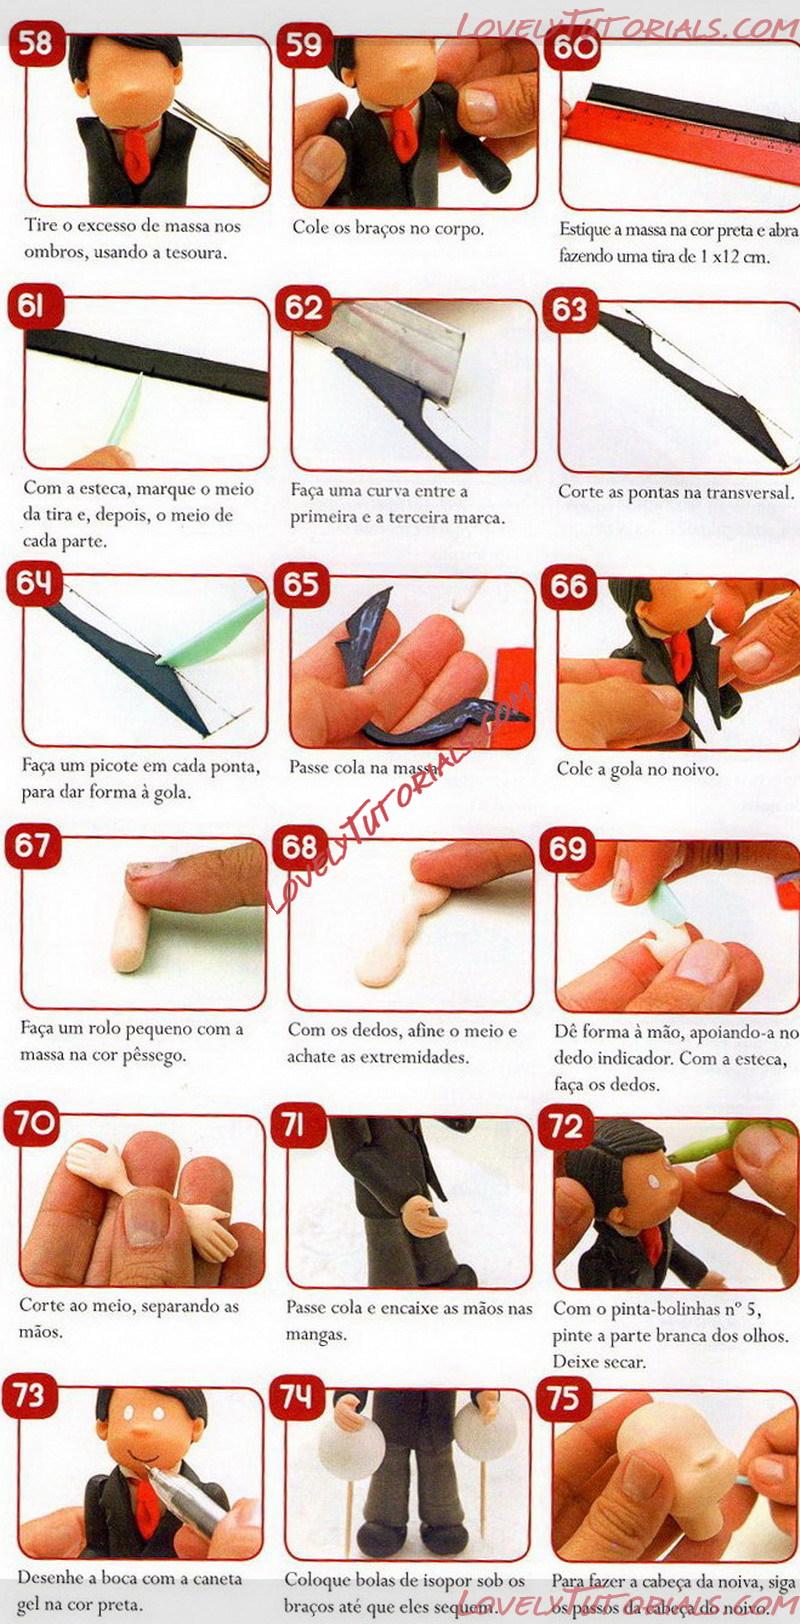 58. Remove excess mass on the shoulders, using scissors.
59. Stick your arms around your body.
60. Roll out the dough in black and open it using a 1 x 12 cm strip.
61. With the csteca, mark the middle of the strip and then the middle of each part.
62. Make a curve between the first and third marks.
63. Cut the ends crosswise.
64. Make a perforation at each end to shape the collar.
65. Glue the dough.
66. Glue the collar to the groom.
67. Make a small roll with the peach-colored dough.
68. Using your fingers, tune the middle and flatten the edges.
69. Form the hand, supporting it on the index finger. With the esteca, make the fingers.
70. Cut in half, spread your hands.
71. Apply glue and fit your hands to the sleeves.
72. With paintball n ° 5, paint the white part of the eyes. Let it dry.
73. Draw the mouth with the black gel pen.
74. Place Styrofoam balls under your arms until they dry.
75. To make the bride's head, follow the steps of the groom's head.
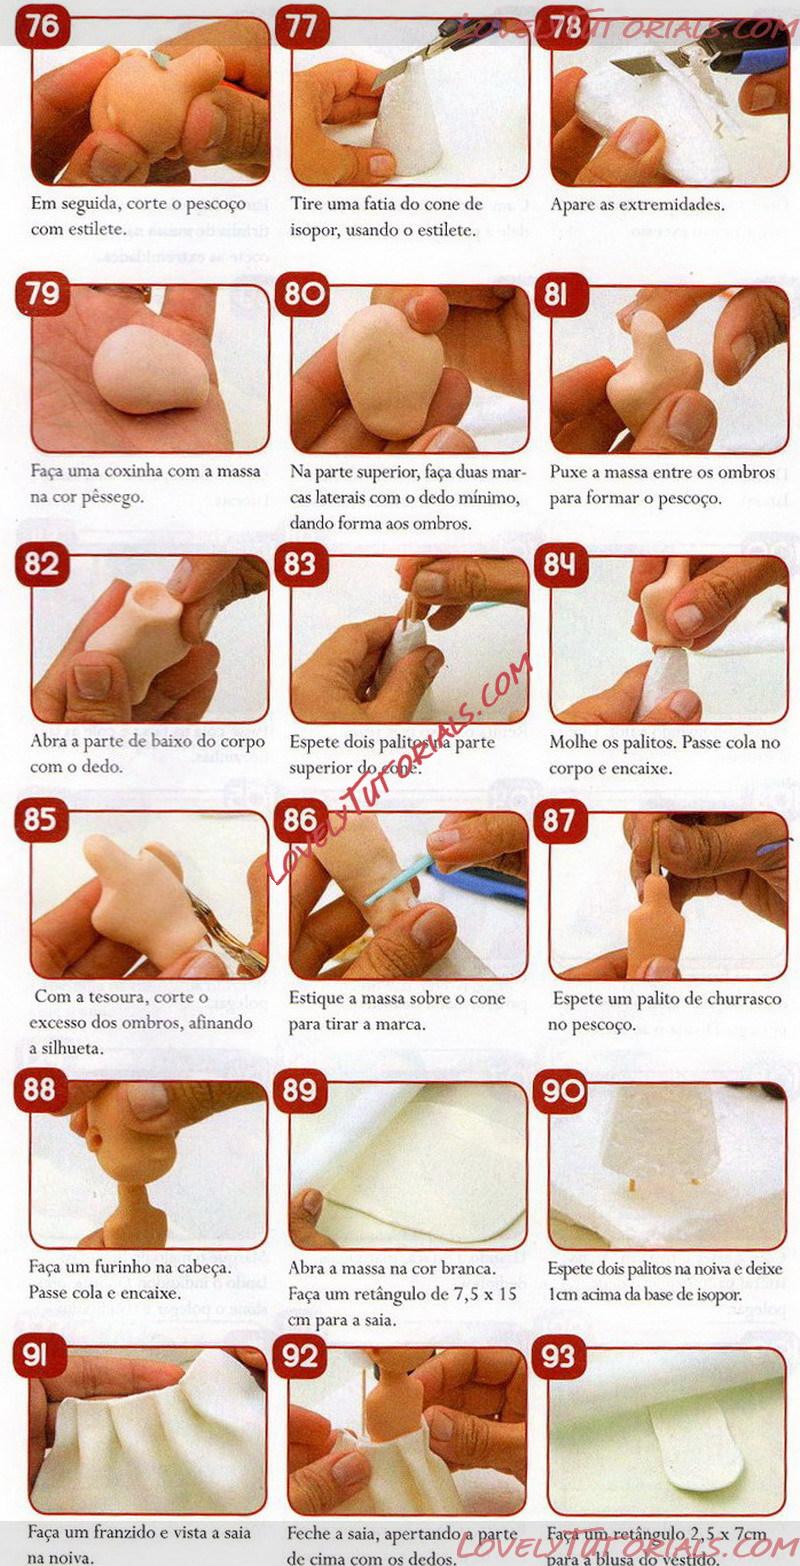 76. Then cut the neck with a knife.
77. Take a slice of the Styrofoam cone, using the stylus.
78. Trim the ends.
79. Make a drumstick with the peach-colored dough.
80. At the top, make two side marks with the little finger, forming the shoulders.
81. Pull the dough between your shoulders to form the neck.
82. Open your lower body with your finger.
83. Stick two toothpicks at the top of the cone.
84. Wet the toothpicks. Glue the body and fit.
85. With the scissors, cut the excess of the shoulders, refining the silhouette.
86. Stretch the dough over the cone to remove the mark.
87. Stick a barbecue stick around your neck.
88. Make a little hole in the head. Apply glue and fit.
89. Open the dough in white. Make a 7.5 x 15 cm rectangle for the skirt.
90. Stick two toothpicks on the bride and leave 1 cm above the styrofoam base.
91. Make a frown and put the skirt on the bride.
92. Close the skirt by squeezing the top with your fingers.
93. Make a 2.5 x 7cm rectangle for the dress blouse.
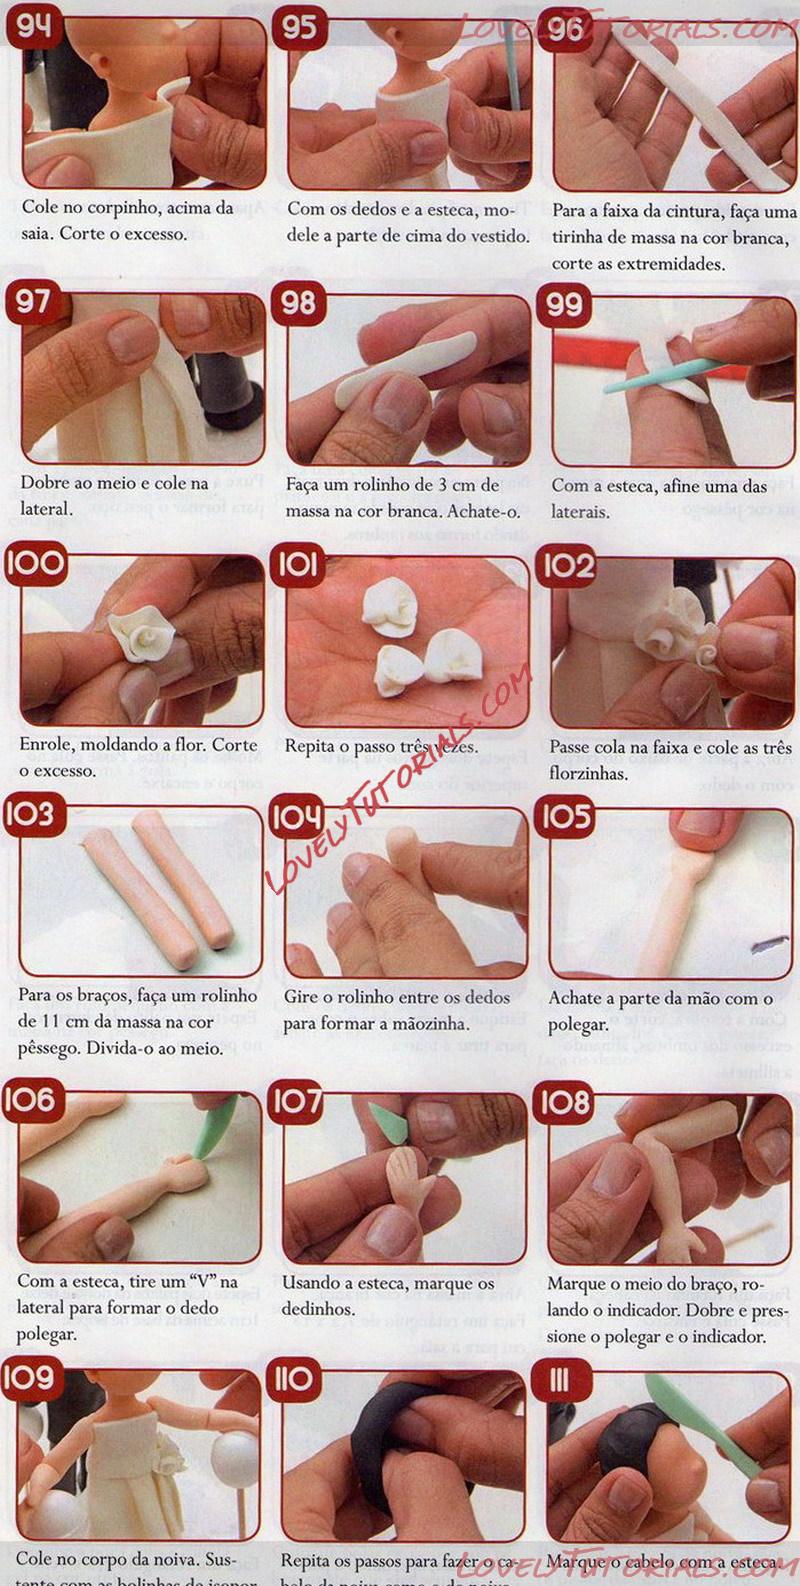 94. Stick it on the little body, above the skirt. Cut off the excess.
95. With your fingers and tie it, shape the top of the dress.
96. For the waistband, make a white strip of dough, cut the ends.
97 Fold in half and glue to the side.
98. Make a 3 cm white dough roll. Flatten it.
99. With the stool, tune one side.
100. Roll it up, shaping the flower. Cut off the excess.
101. Repeat the step three times.
100. Glue the strip and glue the three florets.
103. For the arms, make an 11 cm roll of peach-colored dough. Divide it in half.
104. Rotate the roll between your fingers to form the little hand.
105. Flatten the part of your hand with your thumb.
106. With the stick, take a "V" on the side to form the thumb.
107. Using the esteca, mark the little fingers.
108. Mark the middle of the arm by rolling the indicator. Bend and press your thumb and forefinger.
109. Stick to the bride's body.
110. Repeat the steps to do
111. Mark the hair with the dry.
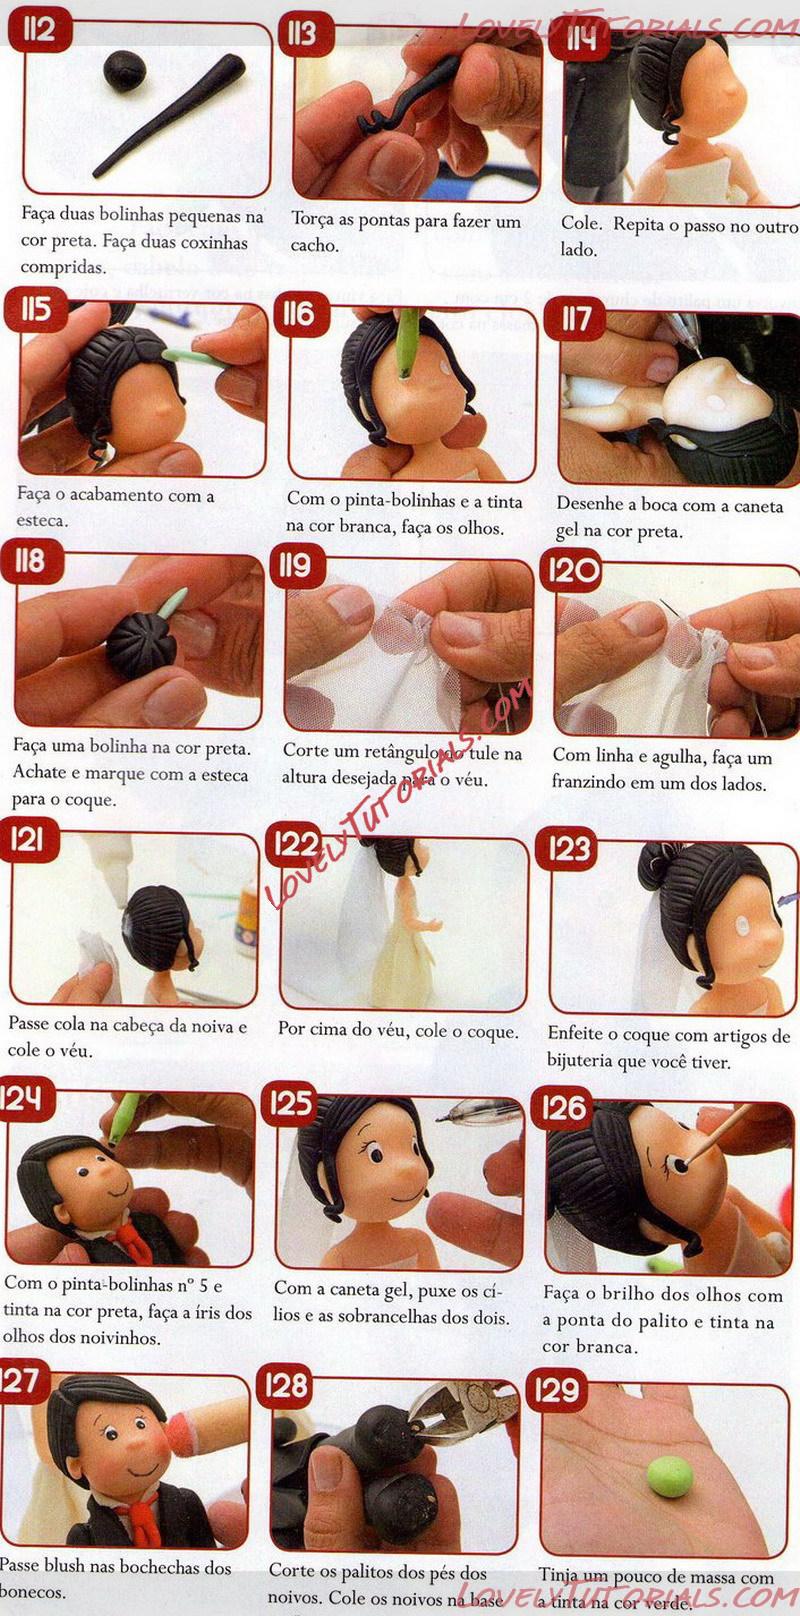 112. Make two small black balls. Make two long drumsticks.
113. Twist the ends to make a bunch.
114. Cole. Repeat the step on the other side.
115. Finish with the stoma.
116. With the dot paint and white paint, make your eyes.
117. Draw the mouth with the black gel pen.
118. Make a black ball. Flatten and mark with the esteca for the coke.
119. Cut a rectangle to the tulle at the desired height for the veil.
120. With a thread and needle, frown on one side.
121. Glue the bride's head and glue the veil.
122. Glue the bun over the veil.
123. Decorate your bun with jewelry items you have.
124. With the dot painting 5 and black ink, make the iris of the bride and groom's eyes.
125. With the gel pen, pull the eyelashes and eyebrows of both.
126. Make the eyes shine with the tip of the toothpick and white paint.
127. Blush dolls' cheeks.
128. Cut the toothpicks from the bride and groom's feet. Glue the bride and groom to the base
129. Dye a little dough with the green paint.
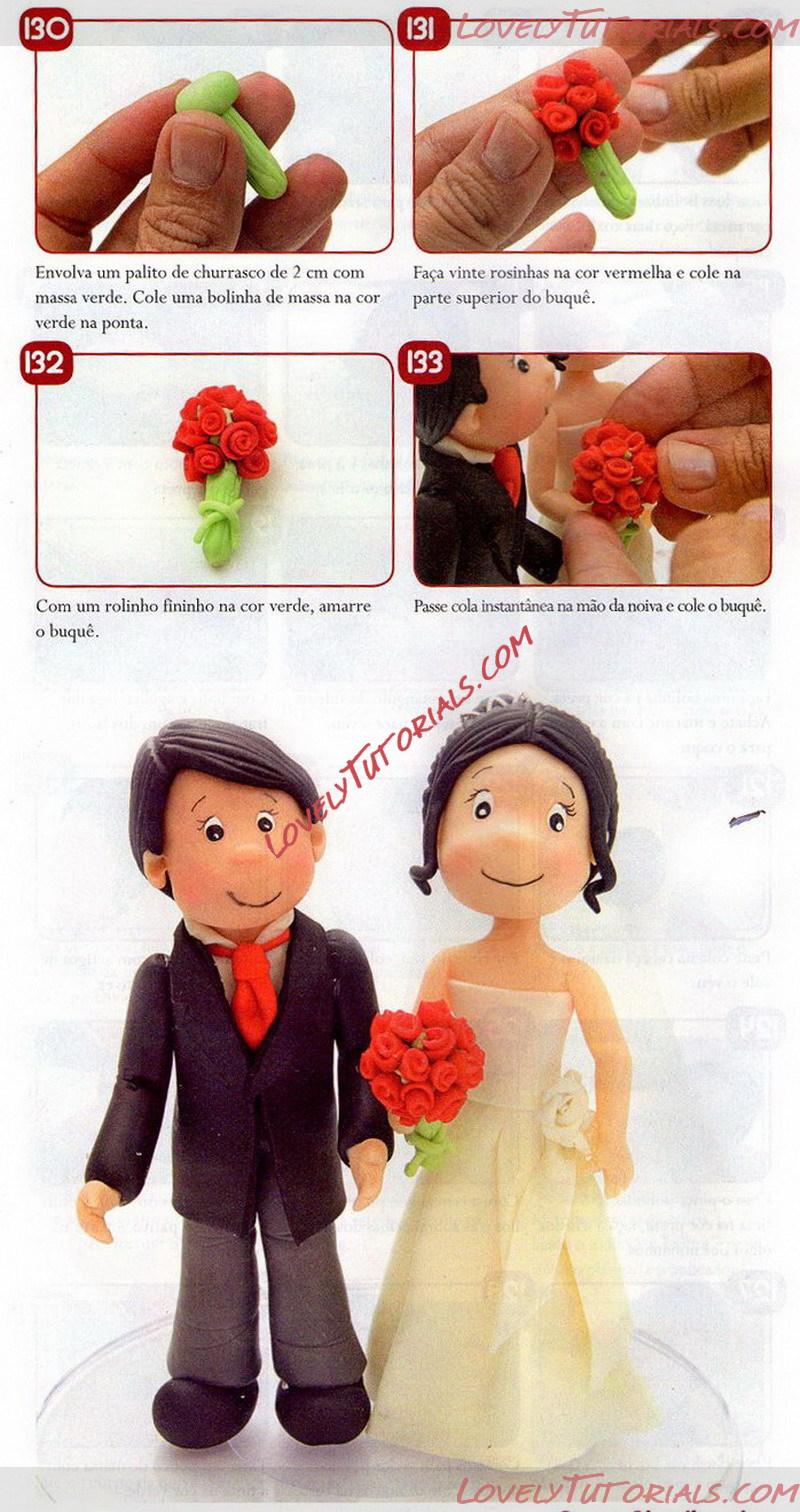 130. Wrap a 2 cm barbecue stick with green dough. Glue a green dumpling to the tip.
131. Make twenty red roses and stick to the top of the bouquet.
132. With a thin green roll, tie the bouquet.
133. Apply instant glue to the bride's hand and paste the bouquet.
“The greatest marriages are built on teamwork. A mutual respect, a healthy dose of admiration, and a never-ending portion of love and grace.”
—Fawn Weaver
|
 |
|
Метки
|
biscuit, bolo de noiva, bonecos de biscuit, bryllupskake, cake decorating, cake decorating techniques, cerâmica plástica, corpo noivos esculpido em isopor, cвадебный торт, decoración de tortas, decorare le torte, decorazioni, deko fondant, dekorace na dort, dekoracija, dekoracije, dekorasyon, figuras, figure making tutorials, figuren, figures, figurice, figurice od fondana, figurines, figurinhas, figurky, figúrky, figür modelleme, fimo, fondan, fondant, fondente, fotopostup, groom & bride wedding cake topper, gum pasta, gumpaste, gâteau de mariage, hochzeitstorte, how to, how-to's, jak na, kage dekoration, kagedekoration, kakebaking, krok za krokem, marcipanové figurky, marshmallow, modelerte figurer, modeling paste, modellierpaste, motivtorten, noivinhos, noivinhos de biscuit, noivos de biscuit, noivos personalizados, ozdoby, pap, paso a paso, passo a passo, passo-a-passo, polymer clay, poročna torta, postupak za ukrasavanje, pravljenje figurica za torte, předměty z marcipánu, schritt für schritt anleitung, schritt-für-schritt, soggetti, step by step, step-by-step, sugarcraft, sugarpaste, svadobná torta, svatební dort, tecnicas de decoracion, tecniche, topo de bolo, topo do bolo, torta de la boda, torta nuziale, torte, torten dekorieren, torti, toy keks, trin for trin, trin-for-trin, trinn for trinn, tutorial, tutorial de fabricação de noivos em biscuit, tutorijal, vestido noiva, wedding cake, zuckerfigürchen, γαμήλια τούρτα, вясельны торт, полимерная глина, пошагово, мк, маршмеллоу, мастика, мастер-класс, жених и невеста, украшение тортов, сватбена торта, сахарная мастика, фигурки, фигурка на торт, фимо, фігурки, фігуркі, холодный фарфор, шаг за шагом  |
|

